ESP32 OTA Updates
This guide walks through performing a remote OTA firmware upgrade for a TuyaOpen ESP32 project on the Tuya IoT Platform. The process follows seven steps: create firmware key → write key into firmware → upload a new version → publish → configure upgrade rule → verify → release.
Prerequisites
- Completed ESP32 Quick Start
- Device connected to Tuya Cloud (UUID / AuthKey configured)
Step 1: Create a Firmware Key
A firmware key uniquely identifies a firmware on the platform. A single product (PID) can have multiple firmware keys, each corresponding to a different hardware variant or firmware branch.
- Log in to the Tuya IoT Platform and go to your product's Product Development > Hardware Development page.
- Select the cloud connection type and hardware module.
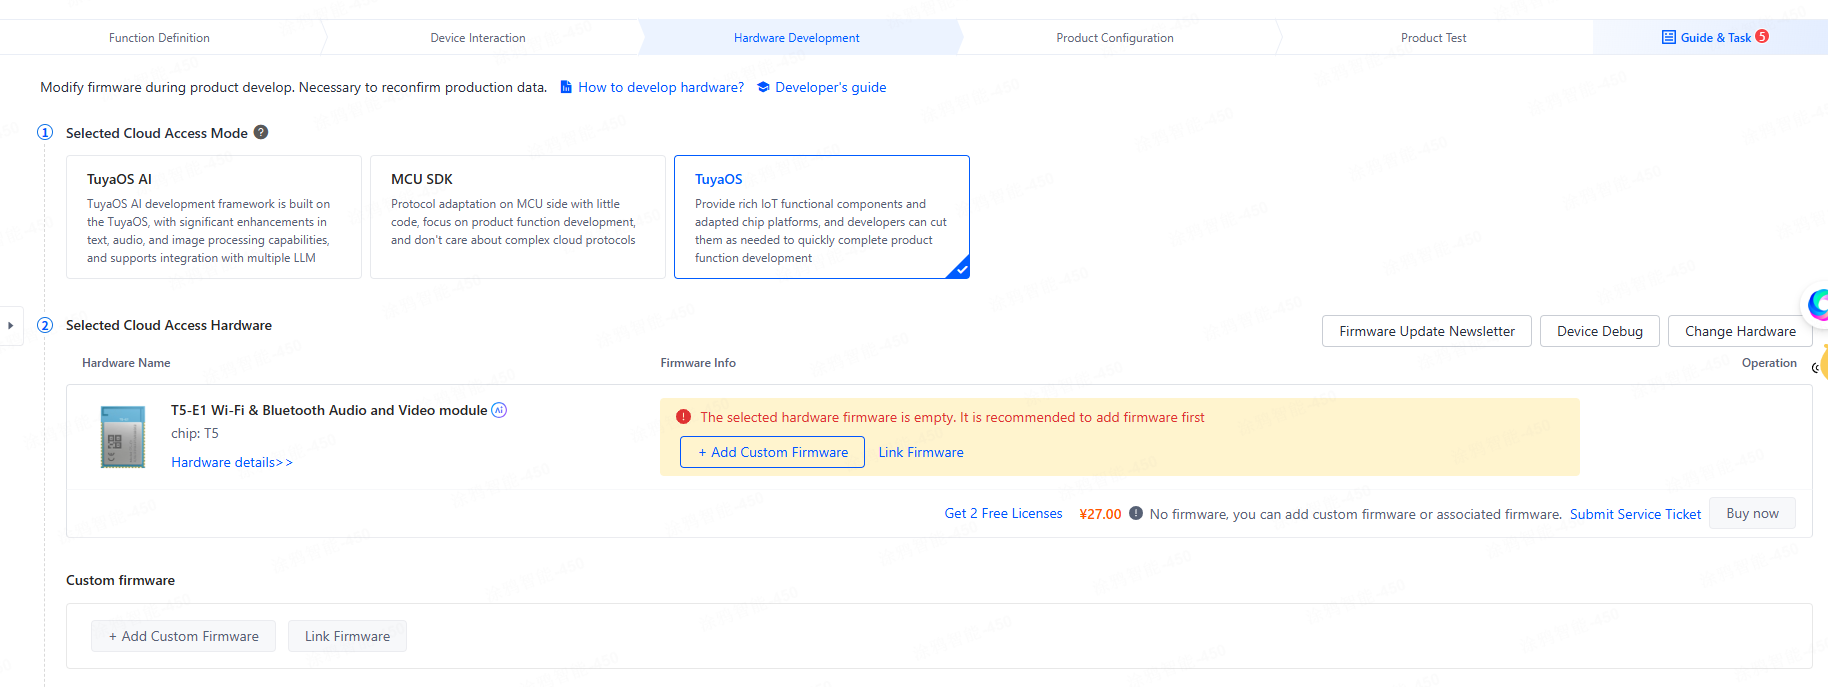
- Cloud connection type: Select TuyaOS or TuyaOS AI.
- Hardware module: If you are using a Tuya ESP32 module, select the corresponding module from the hardware list. If you are using a custom module, this field can be left unselected.
If you want to order ESP32 modules from Tuya but the ESP32 option is not yet visible in the hardware list, contact your Tuya business manager to have your account added to the whitelist. Once whitelisted, the ESP32 module option will appear in the list.
-
Click Add Custom Firmware.
- If you selected a Tuya ESP32 module, click Add Custom Firmware in the row of the selected module solution.
- If you are using a custom ESP32 module, click Add Custom Firmware in the custom firmware row.
-
Fill in the firmware basic information and click Confirm. The platform generates a firmware key.
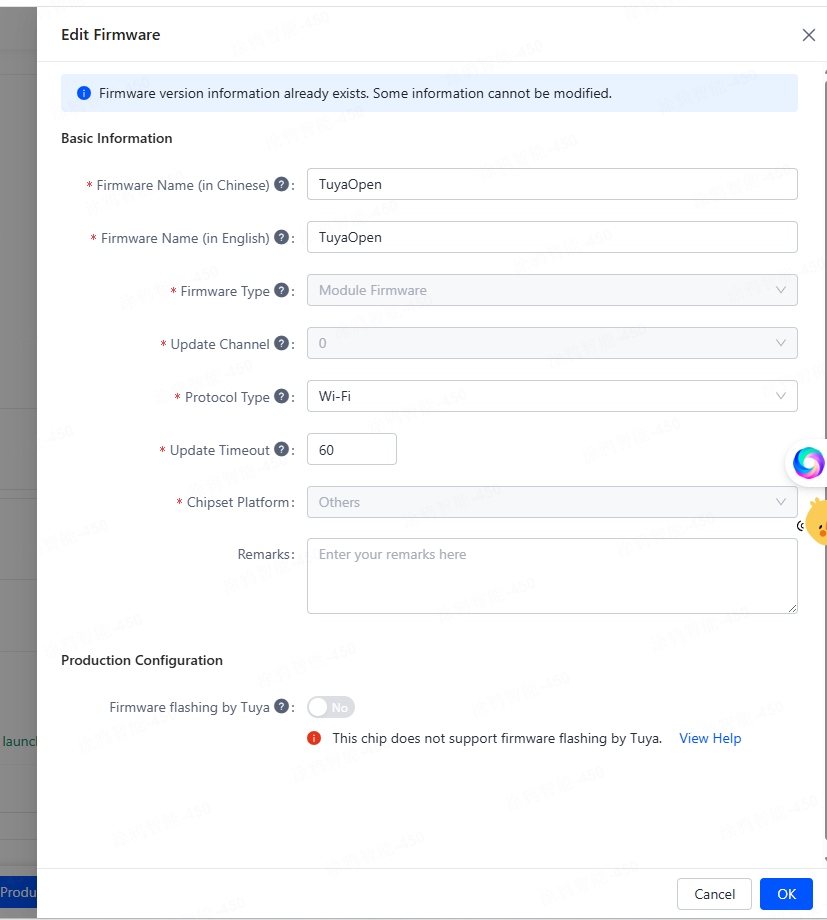
- Firmware name: Can be customized.
- Firmware type: Select Module Firmware (Direct Connect).
- Network type: Select Wi-Fi.
- Custom hardware does not support Tuya production solutions.
- Copy the generated firmware key — you will need to embed it in your firmware code.
Step 2: Write the Firmware Key into Firmware
Setting firmware_key is optional. If omitted, the platform assumes there is only one firmware per PID and no key distinction is needed during OTA.
If the same PID has multiple firmwares with different keys (for example, a product with multiple hardware platforms such as ESP32-S3, ESP32-C3, etc.), you must set firmware_key so the device reports its key to the platform. Without this, the platform cannot determine which firmware to push to which device, and OTA upgrades will not work correctly.
- Define the firmware key in
tuya_config.h(or the equivalent config header for your app):
#define TUYA_DEVICE_FIRMWAREKEY "your_firmware_key_here"
- In
tuya_main.c, find thetuya_iot_initcall and add thefirmware_keyfield:
ret = tuya_iot_init(&ai_client, &(const tuya_iot_config_t){
    .software_ver = PROJECT_VERSION,
    .productkey   = TUYA_PRODUCT_ID,
    .uuid         = license.uuid,
    .authkey      = license.authkey,
    .firmware_key = TUYA_DEVICE_FIRMWAREKEY,   // ← add this line
    .event_handler = user_event_handler_on,
    .network_check = user_network_check,
});
-
Update the firmware version number.
OTA upgrades follow a "lower to higher version" rule — the new firmware version must be higher than the version currently running on the device, otherwise the platform will not push the upgrade.
Run the following command to open the configuration menu:
tos.py config menuNavigate to the Configure Project submenu, find
PROJECT_VERSION, and set it to a higher version number. The format is"xx.xx.xx"(for example,"1.0.1"). -
Run
tos.py clean -f, then rebuild and re-flash the firmware.
Step 3: Upload a New Firmware Version
- In the left navigation, go to Product > Device > Firmware Management.
- Find the corresponding firmware key and click Add Firmware Version.

-
Fill in the version number and release notes, then upload the compiled firmware files one by one. TuyaOpen ESP32 produces three firmware types, identifiable by filename:
Firmware Type Filename Pattern Description Production firmware Contains QIOFor full-chip factory flashing User-partition firmware Contains UAFor partition-based factory flashing Upgrade firmware Contains UGFor remote OTA upgrades infoTuyaOpen firmware does not currently support differential (delta) upgrades. Always upload the full firmware package.

- Click Save. The version is created with status Unpublished.
Step 4: Publish the Firmware Version
Firmware versions are unpublished by default and must be published before they can be used for OTA.
- In the firmware version list, find the newly uploaded version and click Publish Firmware.
- Check Upgrade Firmware as the publish content and set the allowed usage scope (default: unrestricted).
- Confirm. The version status changes to Published.

Step 5: Configure the Upgrade Rule
- In the left navigation, go to Product > Device > Firmware OTA.
- Under Firmware Source, select the firmware with the Custom Upload attribute.
- Click New Firmware Upgrade and fill in the configuration:

| Parameter | Description |
|---|---|
| Firmware Version | Select the newly published version |
| Upgrade Method | App-prompted / App-forced / App-detected |
| Versions to Upgrade | Select the old versions to be upgraded (all lower versions selected by default) |
| Regions | Select target regions (all regions selected by default) |

- Click Confirm. An upgrade record is created.
Step 6: Verify
It is recommended to verify the OTA flow on test devices before releasing to all users.
- Click Common Verification Devices to add test devices to the whitelist via App account or device ID.
- Click Verify to push the firmware to the test devices.
- Click Check Upgrade Completion to confirm the devices have successfully upgraded to the new version.
Step 7: Release
After verification passes, click Release to push the upgrade.
- Gradual rollout: Push to a small percentage of devices first (5% is recommended), monitor upgrade data, and gradually increase to 100%.
- Full rollout: Push to all eligible devices immediately.
Gradual rollout is strongly recommended. If a firmware issue is found after release, you can pause the rollout at any time and resume after the issue is resolved.
After release, check the Upgrade Device Details section to monitor the upgrade status per device.