Quick Start
This guide gets you from a clean Arduino IDE to a flashed T5 example: install the IDE, add the Tuya board manager, pick a development board, and provision the device through the app.
Download the Arduino IDE
Install the latest version of the Arduino IDE. Visit the Arduino official website to download the build for your operating system. All compilation and flashing tests for this project were conducted on Arduino IDE 2.
Install the board manager
-
Copy one of the board manager URLs below.
- GitHub URL:
https://github.com/tuya/arduino-tuyaopen/releases/download/global/package_tuya_open_index.json- Gitee URL:
https://gitee.com/tuya-open/arduino-tuyaopen/releases/download/global/package_tuya_open_index_cn.json -
Launch Arduino IDE 2, then click File -> Preferences to open the Preferences window.
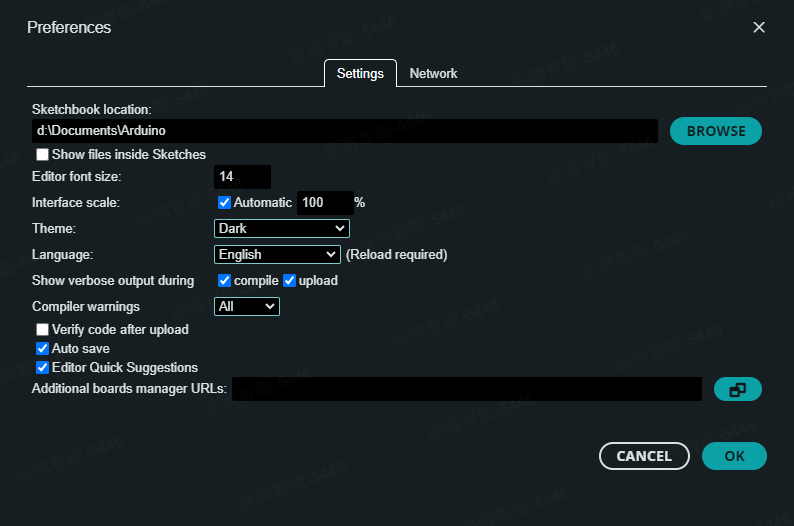
Arduino IDE Preferences window -
Enter the board manager URL in the Additional boards manager URLs field.
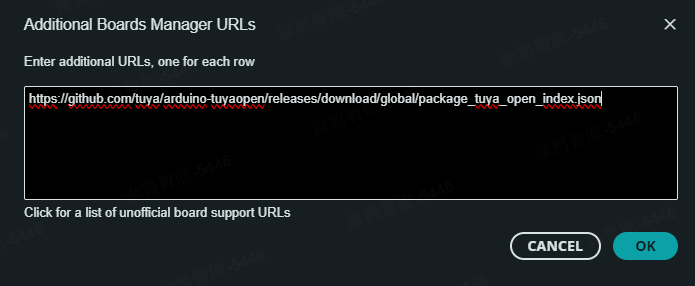
Additional boards manager URLs field -
Open the Boards Manager panel on the left, search for
Tuya Open, then install the latest version. After installation, you can select TUYA series development boards.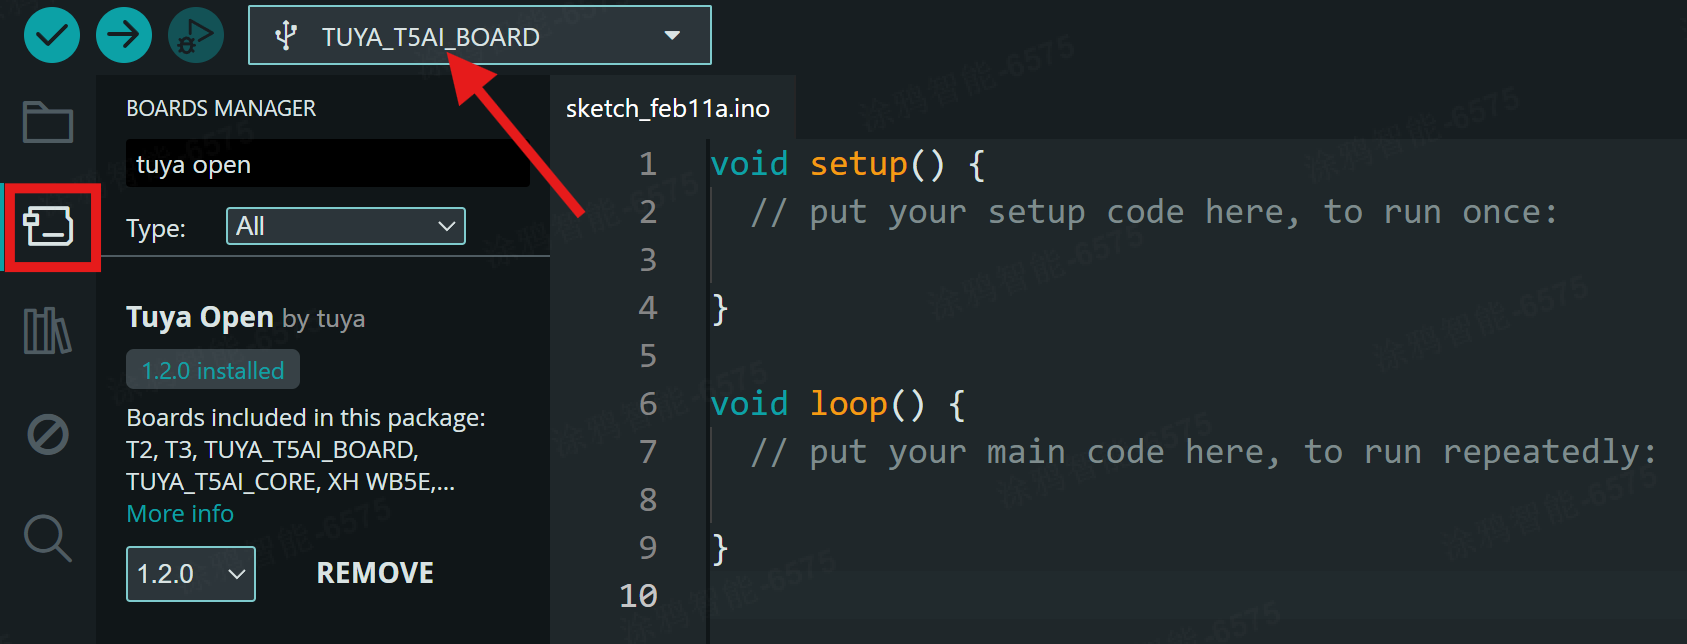
Boards Manager panel with Tuya Open installed
Hardware selection
Develop with the T5AI-Board Devkit and the T5AI-Core Devkit.
- T5AI-Board Devkit: rich peripheral extensions including an LCD screen, camera, microphone, speaker, SD card, and more.
- T5AI-Core Devkit: a highly integrated voice core development board, ideal for low-power and portable AIoT voice interaction development.
Provision the device with the app
All Tuya AIoT devices use the Smart Life APP for network provisioning. For app download and detailed provisioning steps, see the Device Provisioning documentation.
Cloud services and AIoT capabilities
All Tuya AIoT capabilities are bound to the device's PID. The default PID in the example code supports the AIoT capabilities used in the current examples. To extend additional capabilities (role management, device self-control, device remote control, database, triggers, AI agent, MCP server), see the Creating a New Product documentation.
Start with the default PID configuration to get familiar with the device features, then add more AI capabilities.
#define TUYA_PRODUCT_ID "xxxxxxxxxxxxxxxx"
Examples overview
Arduino-TuyaOpen ships a rich set of examples covering AI Agent, WiFi, BLE, IoT, Audio/Video, Camera, UART/I2C/SPI, and other peripherals, plus the latest AI capabilities, for fast hands-on development.
- Quick experience:
AIcomponents/examples/YourChatBotis a complete chatbot example. See the Application Development documentation to experience all AI capabilities quickly. - Step-by-step learning: the AI API Development documentation provides progressive AI examples covering text, audio, MCP, Skill, and more. Each peripheral library directory also contains hardware examples (serial, I2C, microphone, speaker, camera, display, SD card, and others).
The example code directory structure is as follows:
AIcomponents        // AI components
└─examples
    ├─00_IoT_SimpleExample
    ├─01_AI_TextChat
    ├─02_AI_AudioChat
    ├─03_AI_AudioSave
    ├─04_AI_Mcp
    ├─05_AI_Skill
    ├─06_AI_TuyaUI
    └─YourChatBot
Audio               // Audio
└─examples
    ├─Audio2SDcard
    ├─AudioRecorder
    └─AudioSpeaker
BLE                 // BLE
└─examples
    └─ble_server
Camera              // Camera
└─examples
    ├─Camera2Display
    └─Camera2SDcard
Display             // Display
└─examples
    ├─DisplayFill
    ├─DisplayPicture
    └─LVGLdemo
DNSServer           // DNS Server
└─examples
    └─CaptivePortal
FSDemo              // File System Demo
└─examples
    ├─LittleFSDemo
    └─SDCardDemo
HTTPClient          // HTTP Client
└─examples
    ├─BasicHttpClient
    └─BasicHttpsClient
Log                 // Log
└─examples
    └─logOutput
MQTTClient          // MQTT Client
└─examples
    ├─mqtt_auth
    ├─mqtt_basic
    └─mqtt_publish_in_callback
Peripherals         // Peripherals
└─examples
    └─Button
SPI                 // SPI
└─examples
    └─spiDemo
Ticker              // Ticker
└─examples
    ├─Blinker
    └─TickerParameter
TuyaIoT             // IoT
└─examples
    ├─dpType
    ├─quickStart
    └─weatherGet
WiFi                // WiFi
└─examples
    ├─SimpleWiFiServer
    ├─WiFiAccessPoint
    ├─WiFiClient
    ├─WiFiClientBasic
    ├─WiFiClientConnect
    ├─WiFiClientEvents
    ├─WiFiClientStaticIP
    ├─WiFiMulti
    ├─WiFiScan
    ├─WiFiScanDualAntenna
    ├─WiFiTelnetToSerial
    └─WiFiUDPClient
Wire                // I2C
└─examples
    └─masterWriter
See also
- Application Development — flash the full
YourChatBotexample. - AI API Development — work through the progressive AI examples.