Agent Development Guide
Overview
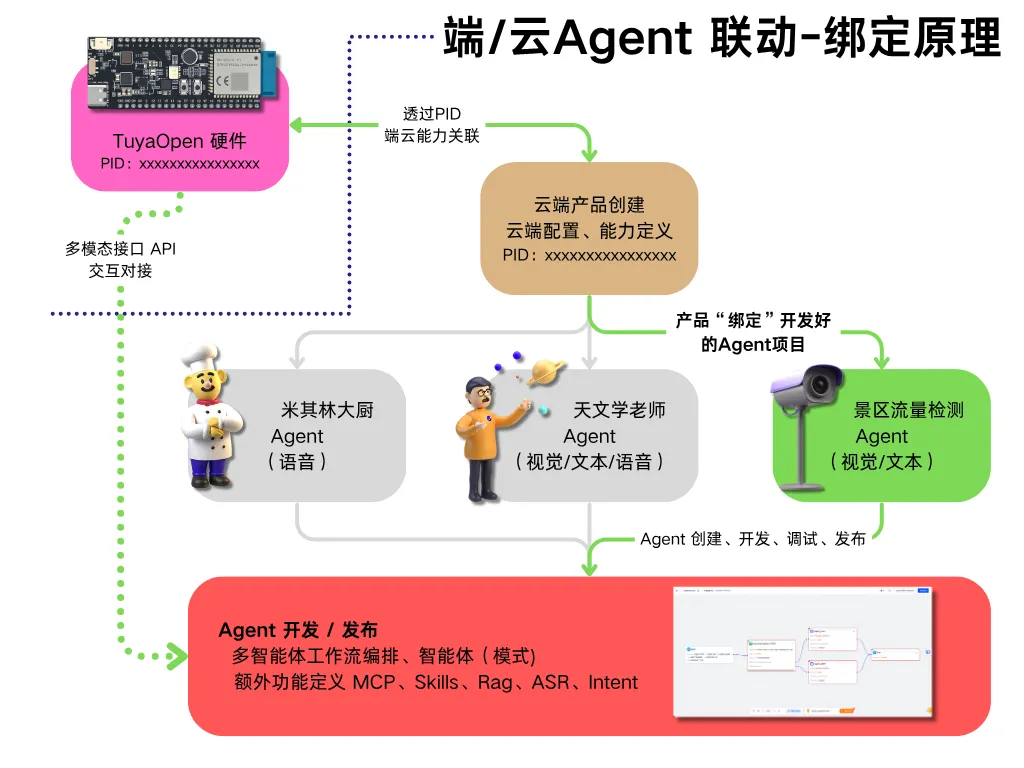
TuyaOpen IDEs connect Tuya IoT hardware to cloud-based AI capabilities. You develop and deploy an Agent once, then bind it to one or more devices through a unique Product ID (PID). The device uses standardized Data Points (DPs) to send telemetry and receive control commands from the Agent.
This guide covers:
- How the device-cloud-Agent architecture works
- Creating and defining a product in the IDE
- Managing DP definitions with AI assistance
- Developing and publishing an Agent
- Binding an Agent to a product
TuyaOpen IDEs work across all supported hardware platforms (T5AI-Core, ESP32S3, BK7231X, Raspberry Pi, and more). The Agent development workflow in the IDE is platform-agnostic.
How it works
The TuyaOpen IDE system follows a three-layer binding model. Every piece of data flows through this architecture consistently.
┌─────────────────┐         ┌─────────────────┐         ┌─────────────────┐
│   Device PID    │◄───────►│   Tuya Cloud    │◄───────►│    AI Agent     │
│  Hardware Code  │ DP API  │ Product + DPs   │ LLM     │ Skills / MCP    │
│                 │  Sync   │                 │ Call    │   Workflows     │
└─────────────────┘         └─────────────────┘         └─────────────────┘
Binding principle
Product ID (PID) is the single binding identifier across all three layers. Every device has a hardware PID. Every cloud product has a PID. Every Agent is bound to a PID. When all three share the same PID, they interoperate automatically.
DP (Data Point) is the data contract. DPs define every piece of data that flows between device and cloud — sensor readings, switch states, raw binary payloads, and more. The Agent reads and writes DPs to observe and control the device.
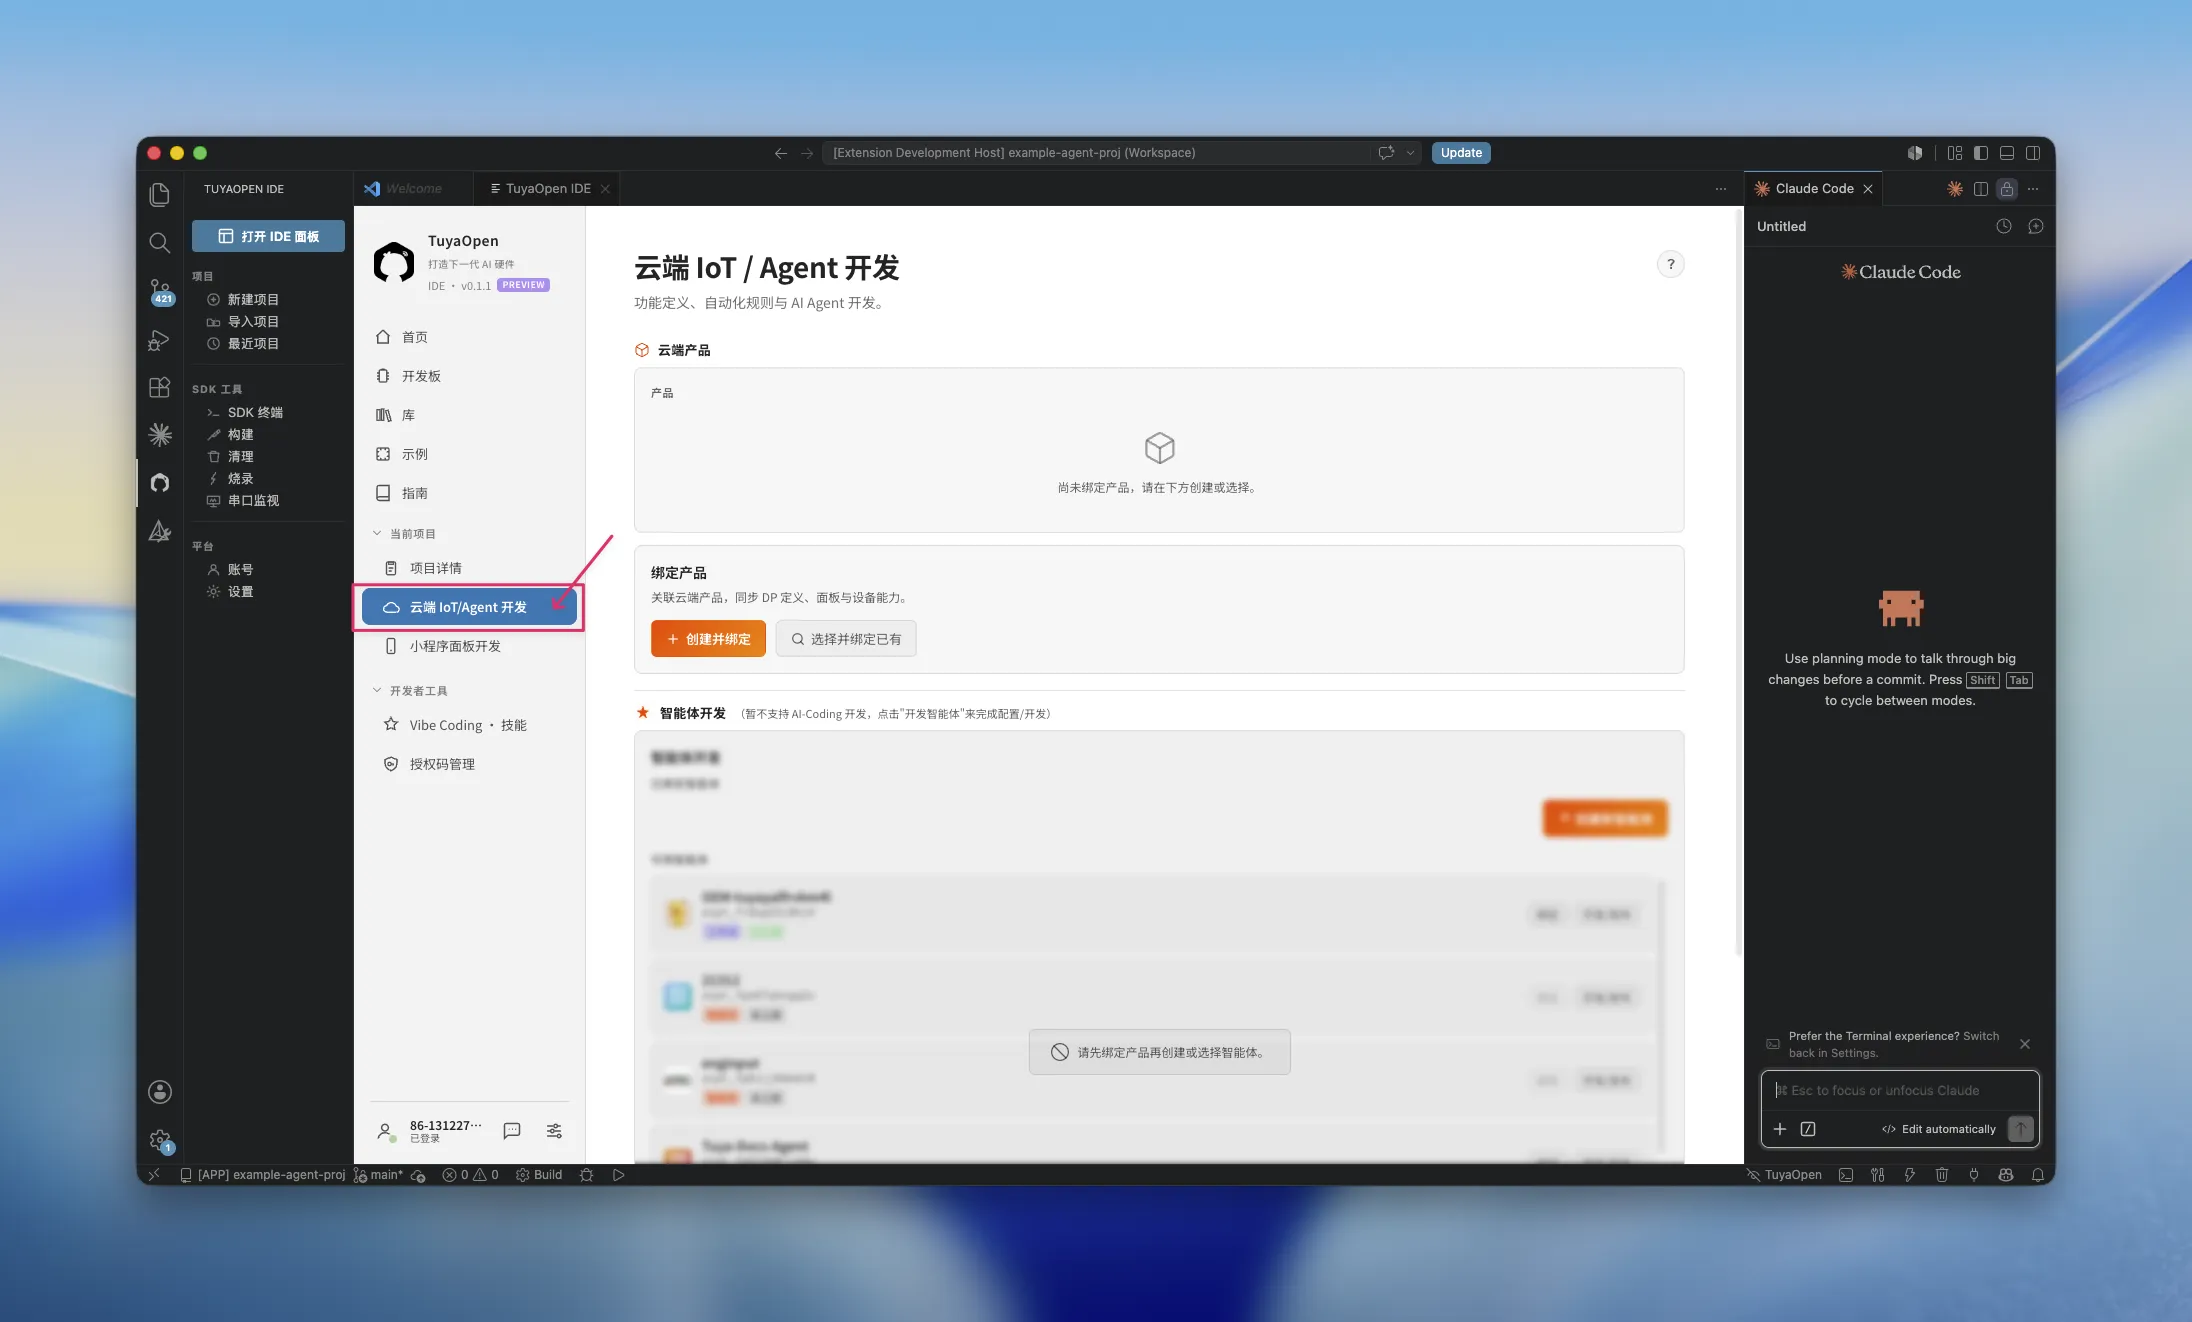
1. Enable Agent development
When you create a new TuyaOpen project in the IDE, you can optionally enable cloud Agent development. Not every project needs cloud capabilities — skip this for local-only firmware.
- Create or open a TuyaOpen project.
- On the project landing page, select Agent from the navigation bar.
- Confirm you want to enable cloud IoT Agent features.
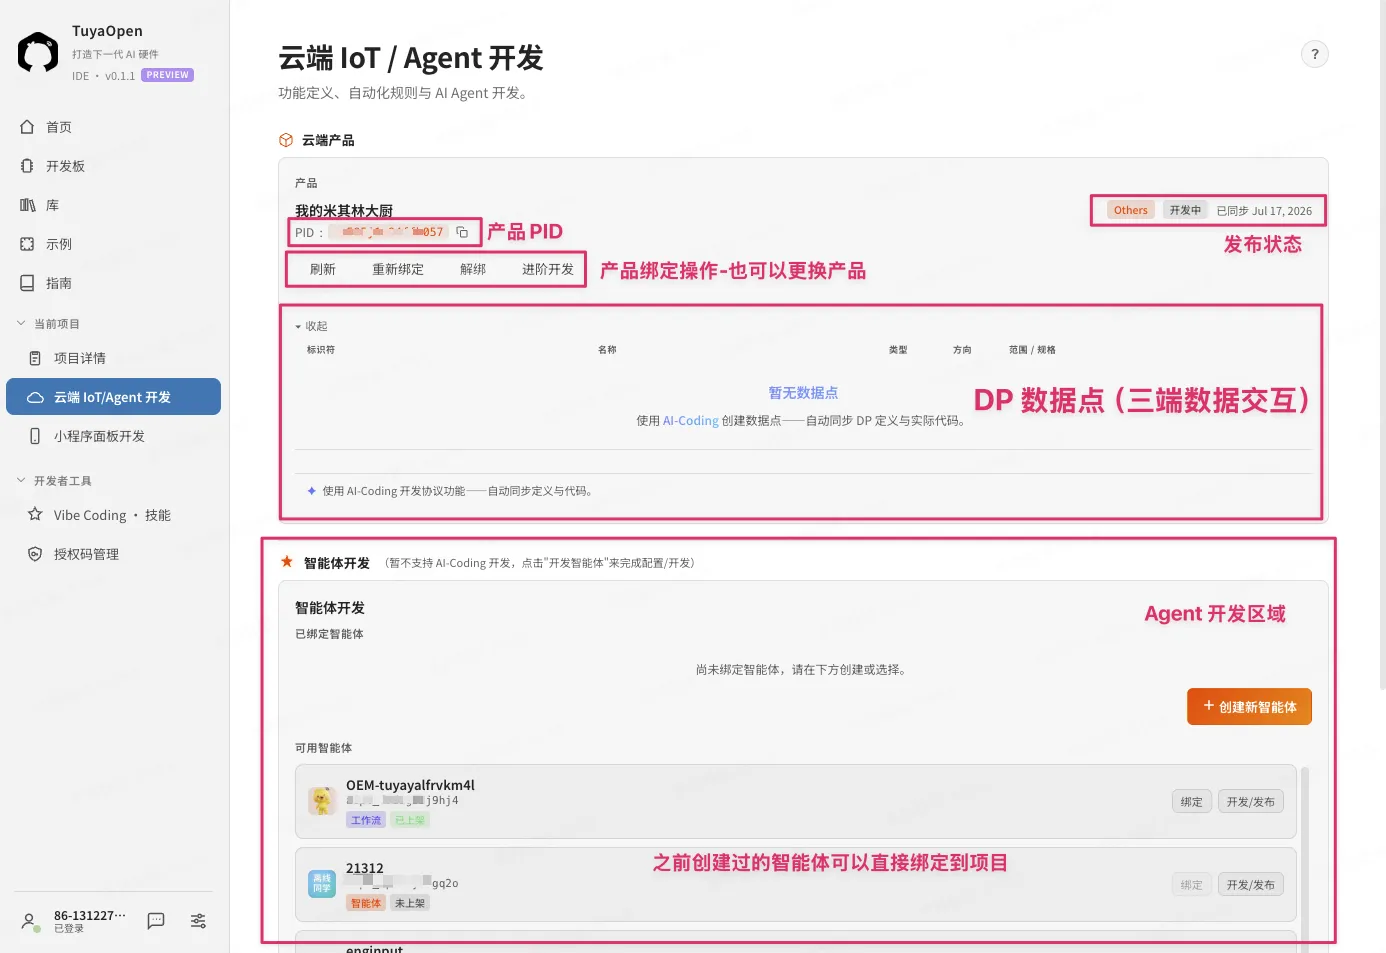
Once enabled, the Agent development page shows four main panels:
| Panel | Purpose |
|---|---|
| Product PID | View or change the product bound to this project |
| Publish Status | Check Agent publish and deployment state |
| DP Data Points | Define and manage the device-cloud data contract |
| Agent Editor | Create, configure, and develop the Agent |
2. Create a product
Before developing an Agent, you need a cloud product. The product holds the DP model that both device firmware and Agent code share. You can create one in two ways.
AI-assisted (recommended)
Describe your product to the IDE AI assistant. It creates the product and generates appropriate DP definitions automatically.
- Open the Agent page in your project.
- In the IDE chat, type:
Create a smart temperature sensor product for me. - The assistant creates the product, defines relevant DPs, and syncs them to your project.
Manual
Step through product configuration in the cloud console.
- On the Agent page, click Create Product.
- Select a product category (for example, Smart Home > Sensor).
- Enter a product name and description.
- Choose the connection protocol.
- Save to generate a PID.
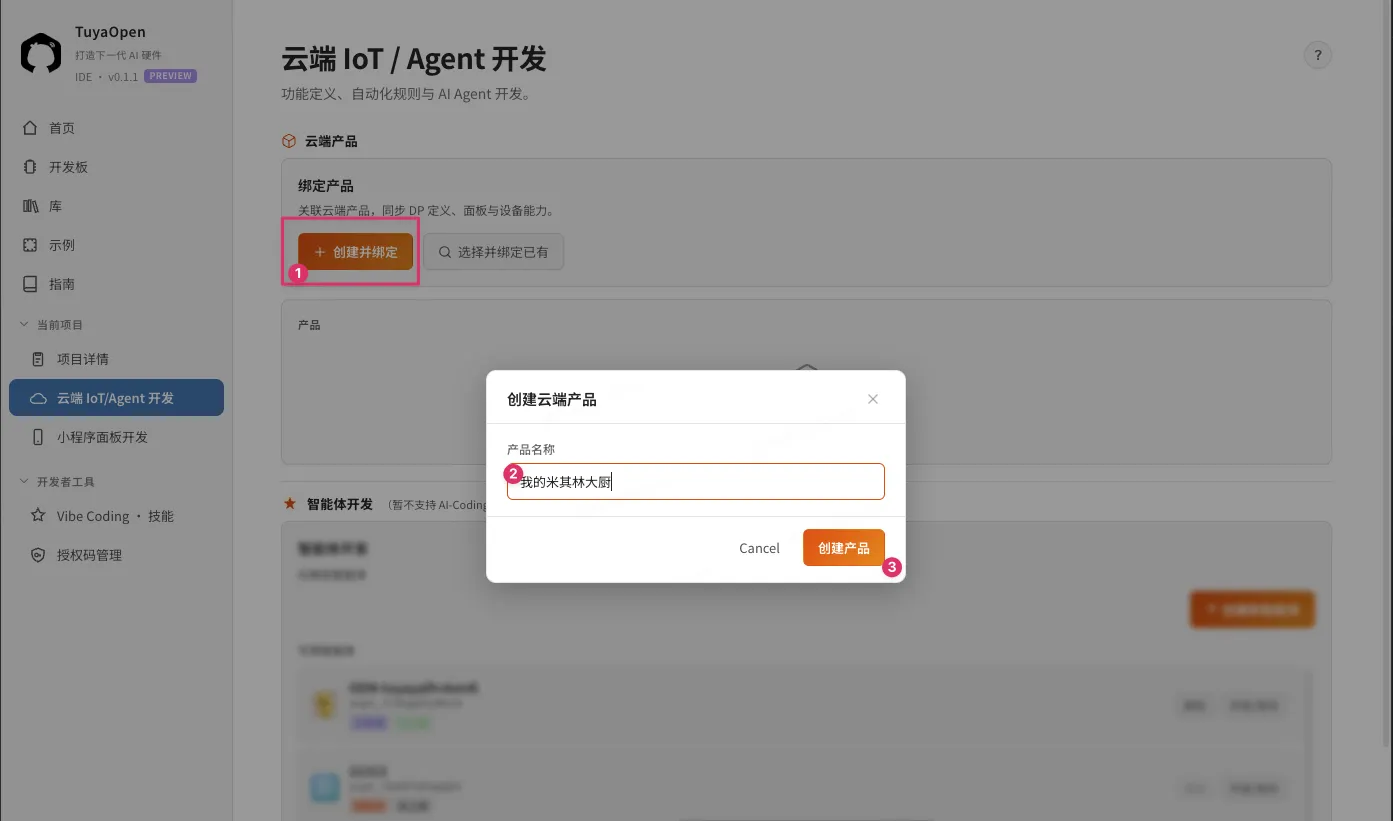
After creation, the PID appears in the Product PID panel.
3. Define DP data points
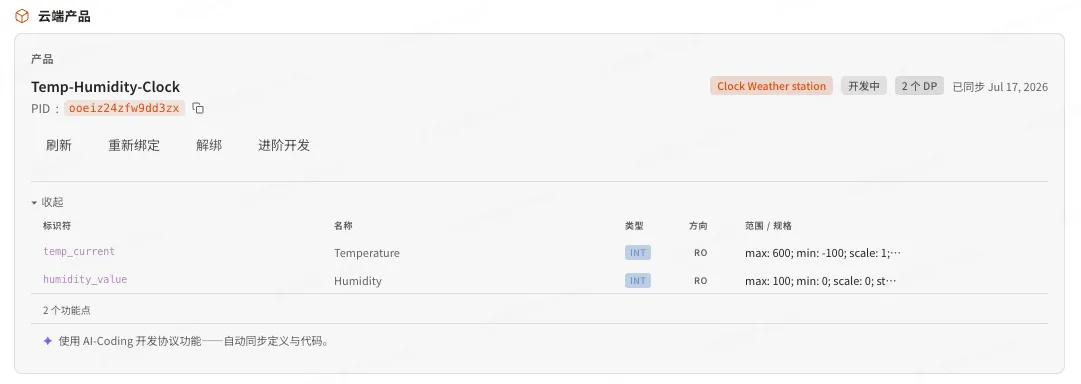
DPs (Data Points) are the data contract between device firmware and the cloud. Every value the device reports, and every command the device receives, travels through a DP.
Each DP has:
| Property | Description |
|---|---|
| DPID | Numeric identifier (1–255) |
| DPCode | Human-readable name (for example, switch_1, temp_current) |
| Type | Boolean, value, enum, string, raw, fault |
| Constraints | Min/max values, step size, enum options |
DPs are shared across device firmware, Tuya Cloud, and the Agent. Changing a DP definition without updating all three breaks communication. Always use the AI workflow for DP changes — it keeps all three layers in sync.
AI-assisted DP management
Use the IDE AI assistant to create, modify, or extend DP definitions. This is the recommended method because it validates DP format and constraints automatically, updates the cloud product model, generates matching device firmware code, and updates panel/app definitions.
Example prompts:
1. Add a boolean DP for a relay switch on channel 1
2. Create a temperature reporting DP with range -40 to 125°C and 0.1°C precision
3. Add a raw data DP for RGB LED strip control — 3 bytes, R G B
4. Create a 3-gang switch with three boolean DPs
The assistant generates the DP definition in the cloud, updates your project config, and generates C code for the device firmware.
Viewing DPs
On the Agent page, the DP Data Points panel shows all DPs defined for the product PID. You can see the DPID, type, name, and current constraints.
DPs as the Agent control interface
The Agent uses DPs to both read and control the device. At inference time: the Agent receives all current DP values from the device, the LLM reasons about device state using those values, and the Agent can write DP values back to the device to execute actions. This is how an Agent performs device control — by reading and writing the DP contract.
4. Develop an Agent
You create an Agent in one of two modes:
| Mode | Use case |
|---|---|
| Agent mode | Single LLM with tools. Straightforward prompt-based development. Best for most device control use cases. |
| Workflow mode | Multi-step orchestration with multiple models, intent recognition, and conditional logic. Best for complex voice assistants or multi-agent systems. |
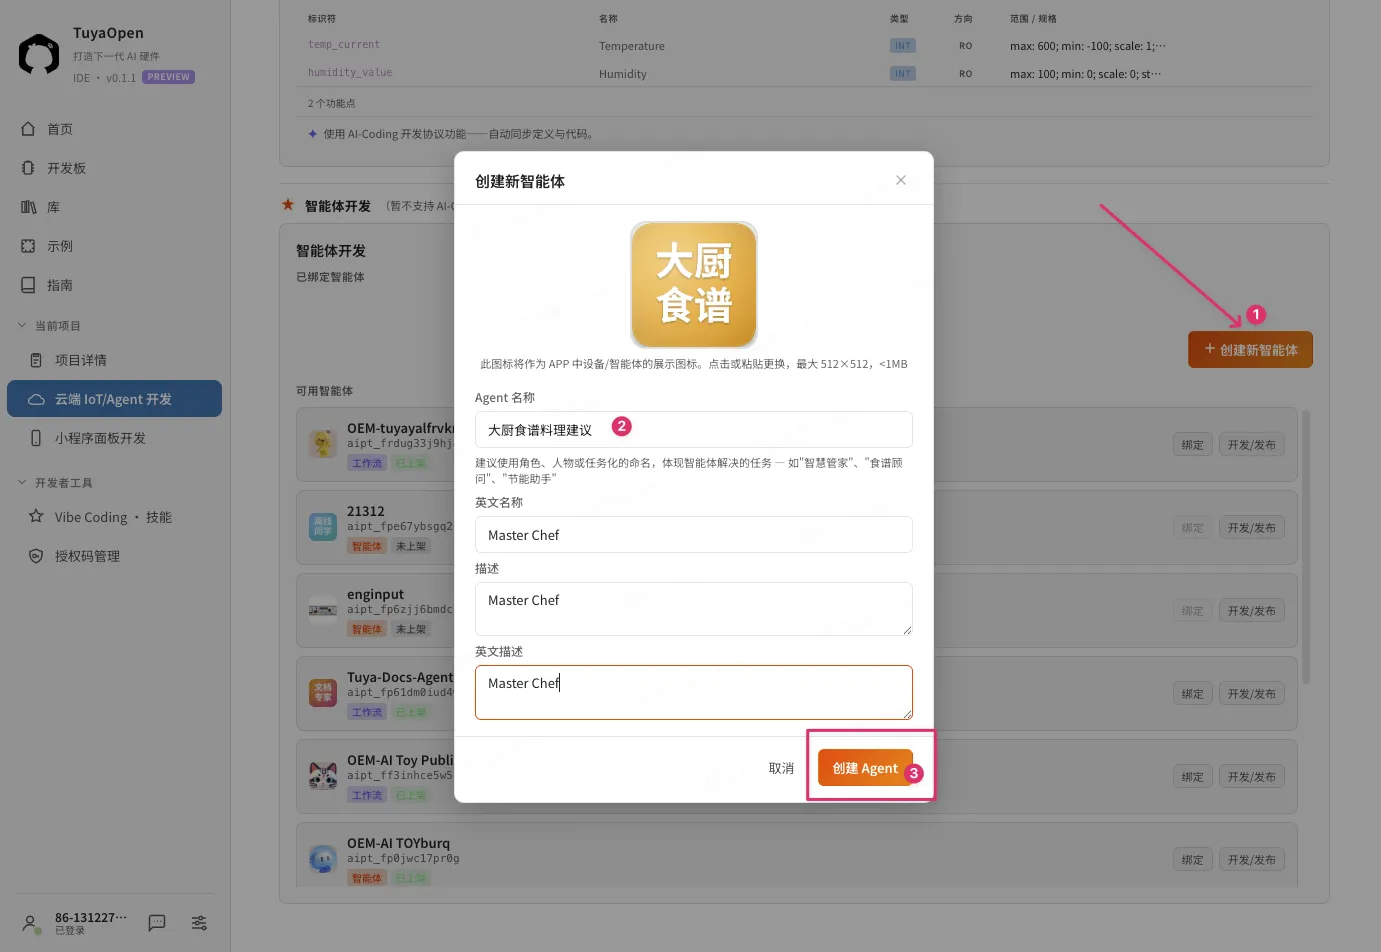
Create a new Agent
- On the Agent page, go to the Agent panel.
- Click Create New Agent.
- Enter a name and description for your Agent.
- Select the mode: Agent or Workflow.
Reuse an existing Agent
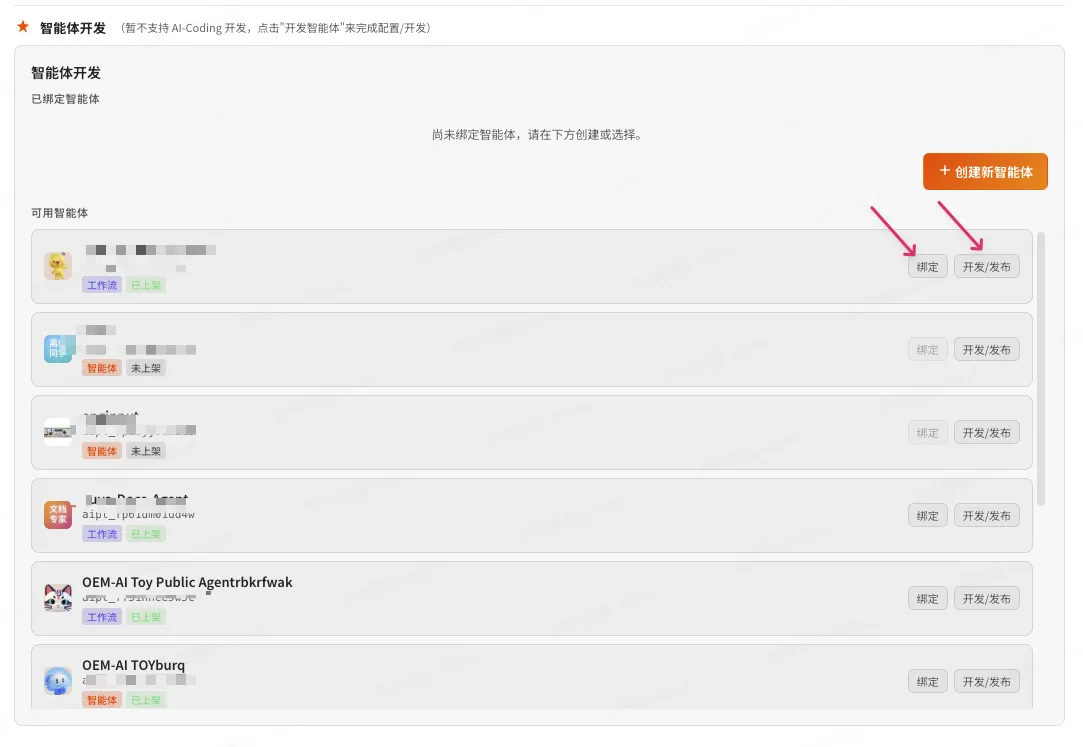
You can bind a previously published Agent to your product. This is useful when you want the same Agent logic across multiple device types.
- On the Agent page, go to the Agent panel.
- Click Select Existing Agent.
- Choose from the list of published Agents.
The selected Agent must be published before it can be bound to a product. Reuse works best when the DPCodes across products are compatible — an Agent written for a single switch may not work correctly on a 3-gang switch unless both use matching DPCodes.
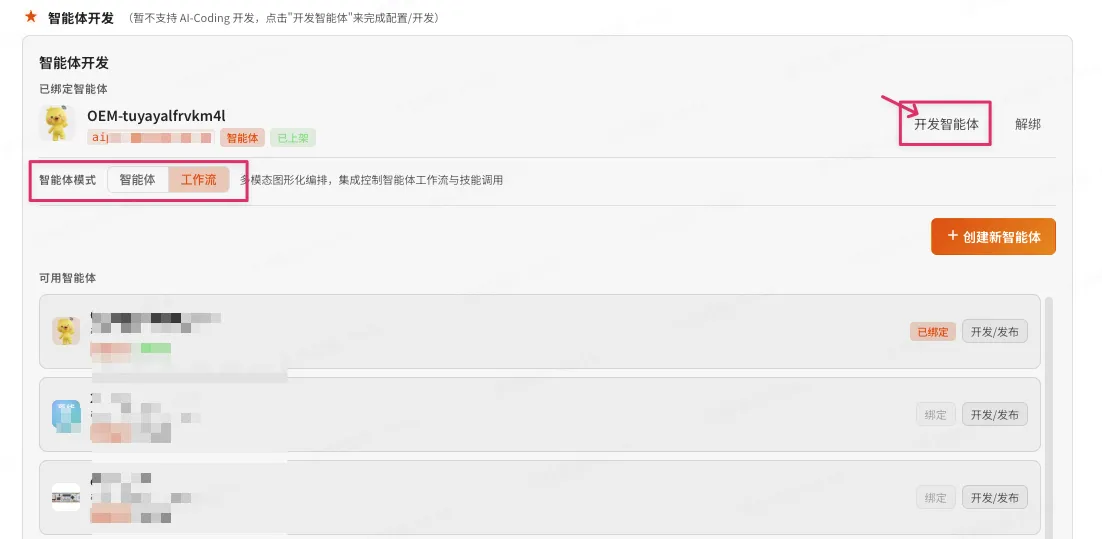
After creation or selection, the Agent is bound to the product PID. You see the binding confirmation in the Agent panel.
5. Agent mode
Agent mode is the default and simplest development model. You configure a single LLM with a system prompt, tools, and capabilities.
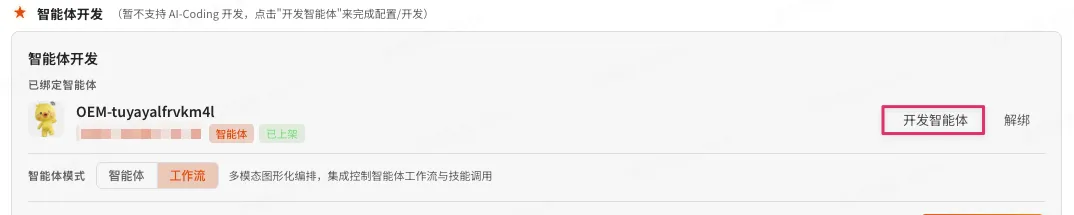
- On the Agent page, click Develop Agent.
- The Agent editor opens.
In Agent mode you configure:
| Config | Description |
|---|---|
| System prompt | Defines the Agent's persona, behavior, and knowledge |
| Model selection | Choose the underlying LLM |
| Tools | Enable MCP connectors, Skills, RAG, and device control |
| Capabilities | Voice (ASR/TTS), vision, and more |
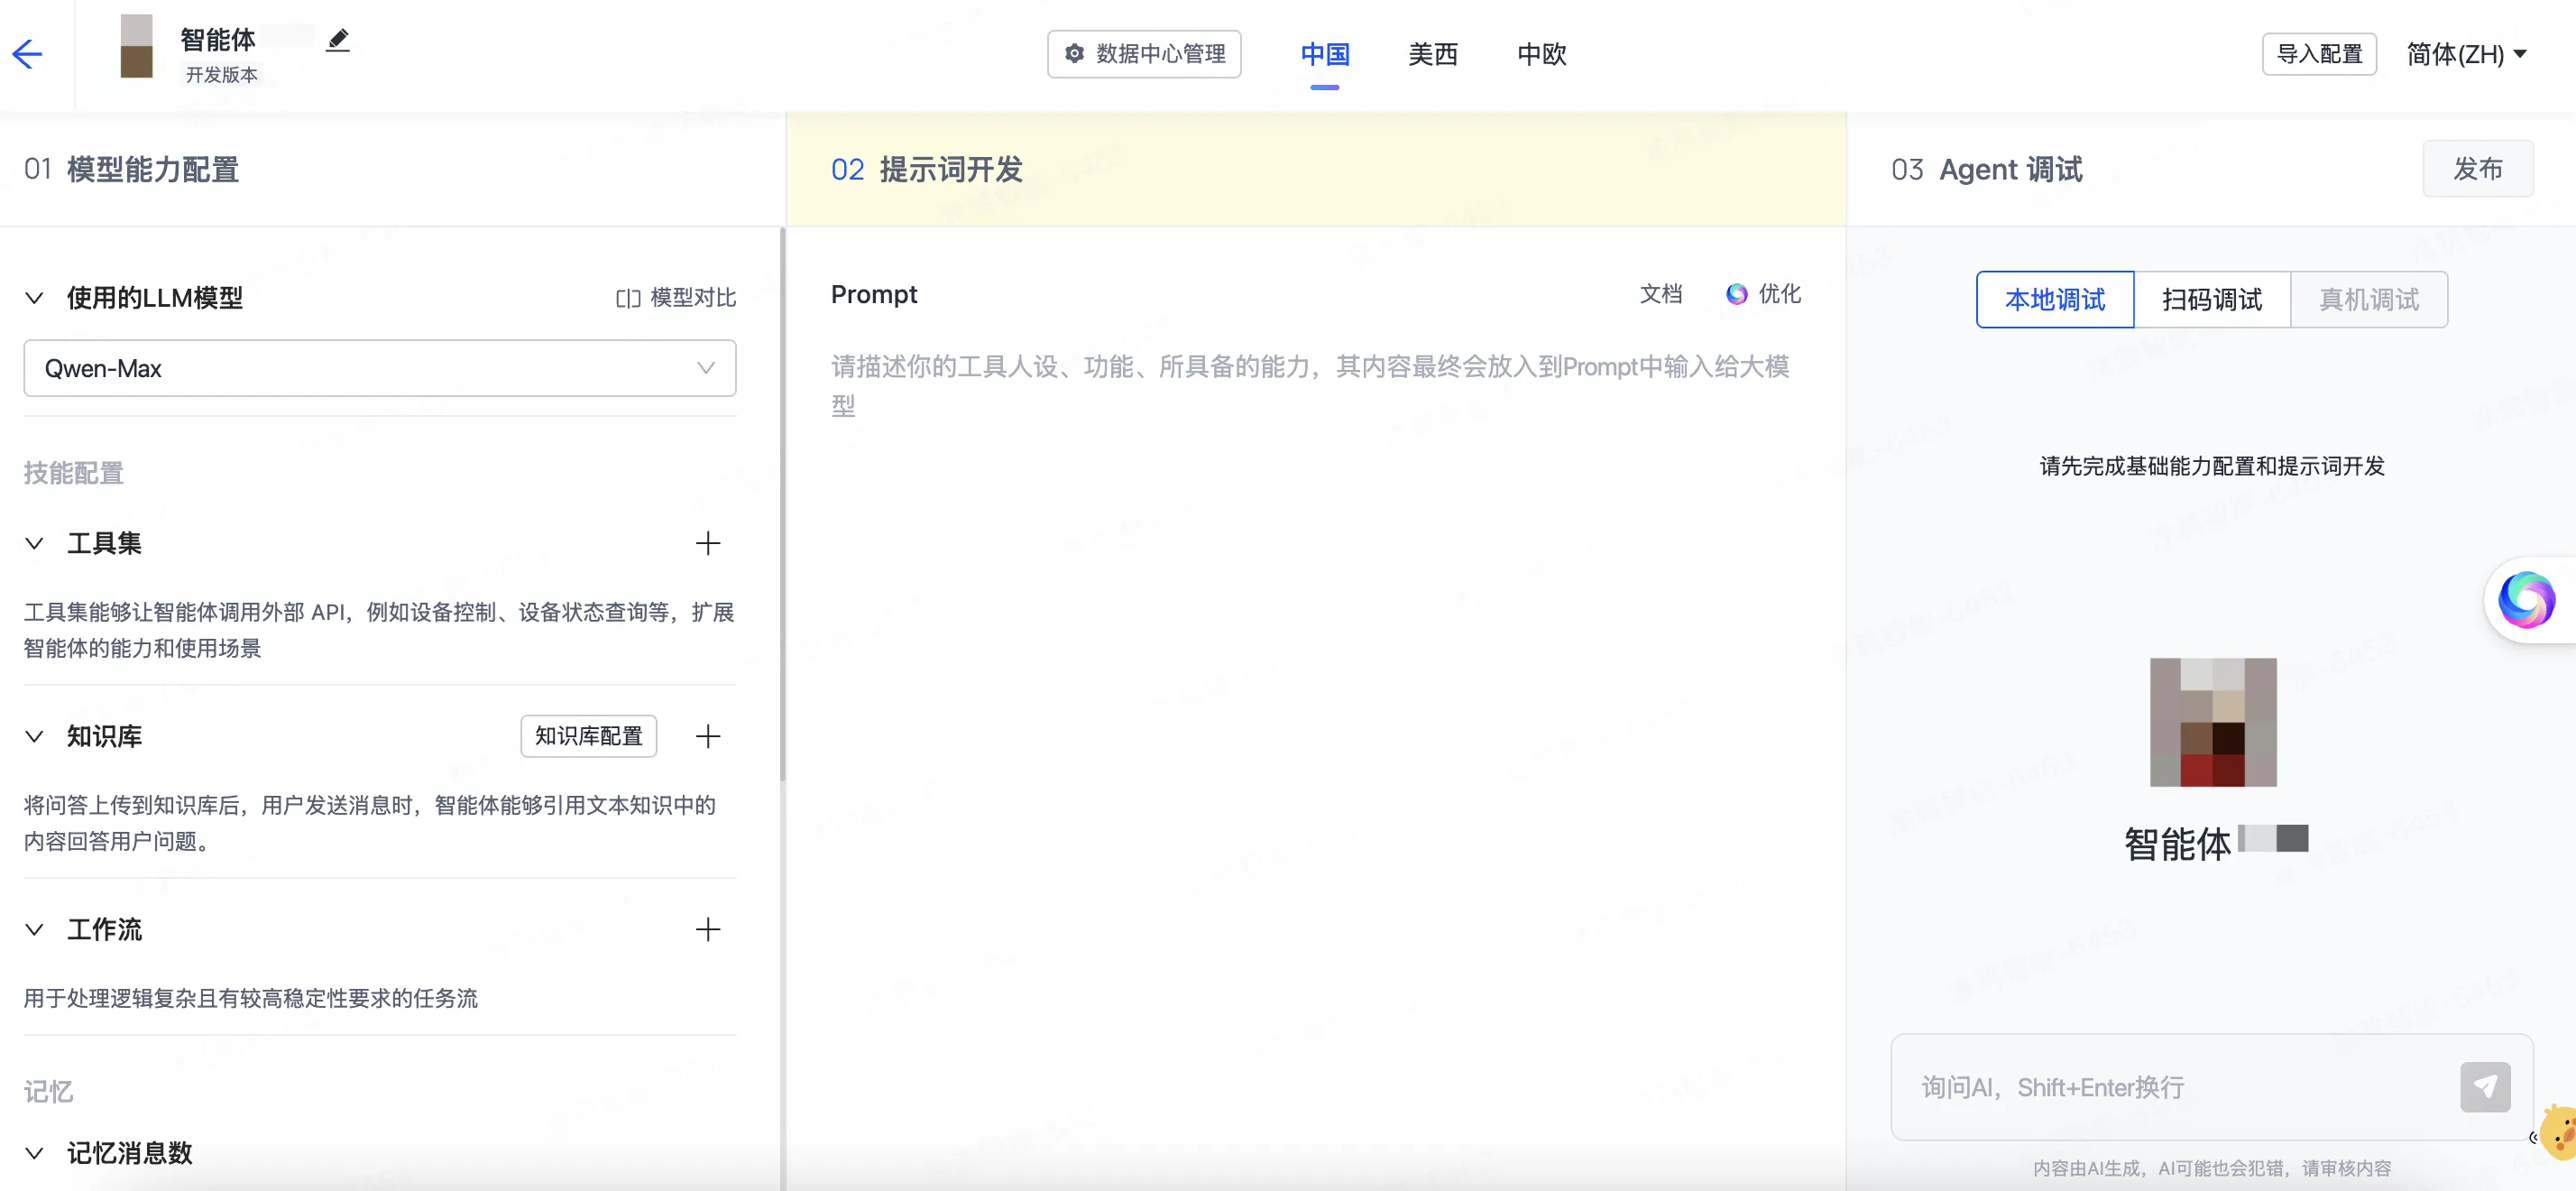
Example system prompt for a thermostat Agent:
You are a thermostat control Agent. Monitor room temperature and humidity.
When temperature exceeds 26°C, turn on the cooler (switch_2 = true).
When temperature drops below 20°C, turn on the heater (switch_1 = true).
Always report the current temperature and humidity when asked.
Keep responses concise and helpful.
The DP read/write tool is automatically available to every bound Agent — you do not need to add it explicitly.
6. Workflow mode
Workflow mode lets you build complex multi-step Agent systems. Use it when you need intent recognition, model chaining, conditional logic, or parallel execution.
Workflow mode capabilities:
- Intent recognition — route user queries to different handlers based on intent.
- Multi-model orchestration — call different models for different tasks.
- Conditional branches — logic gates based on intermediate results.
- Synchronous and parallel execution — control execution flow.
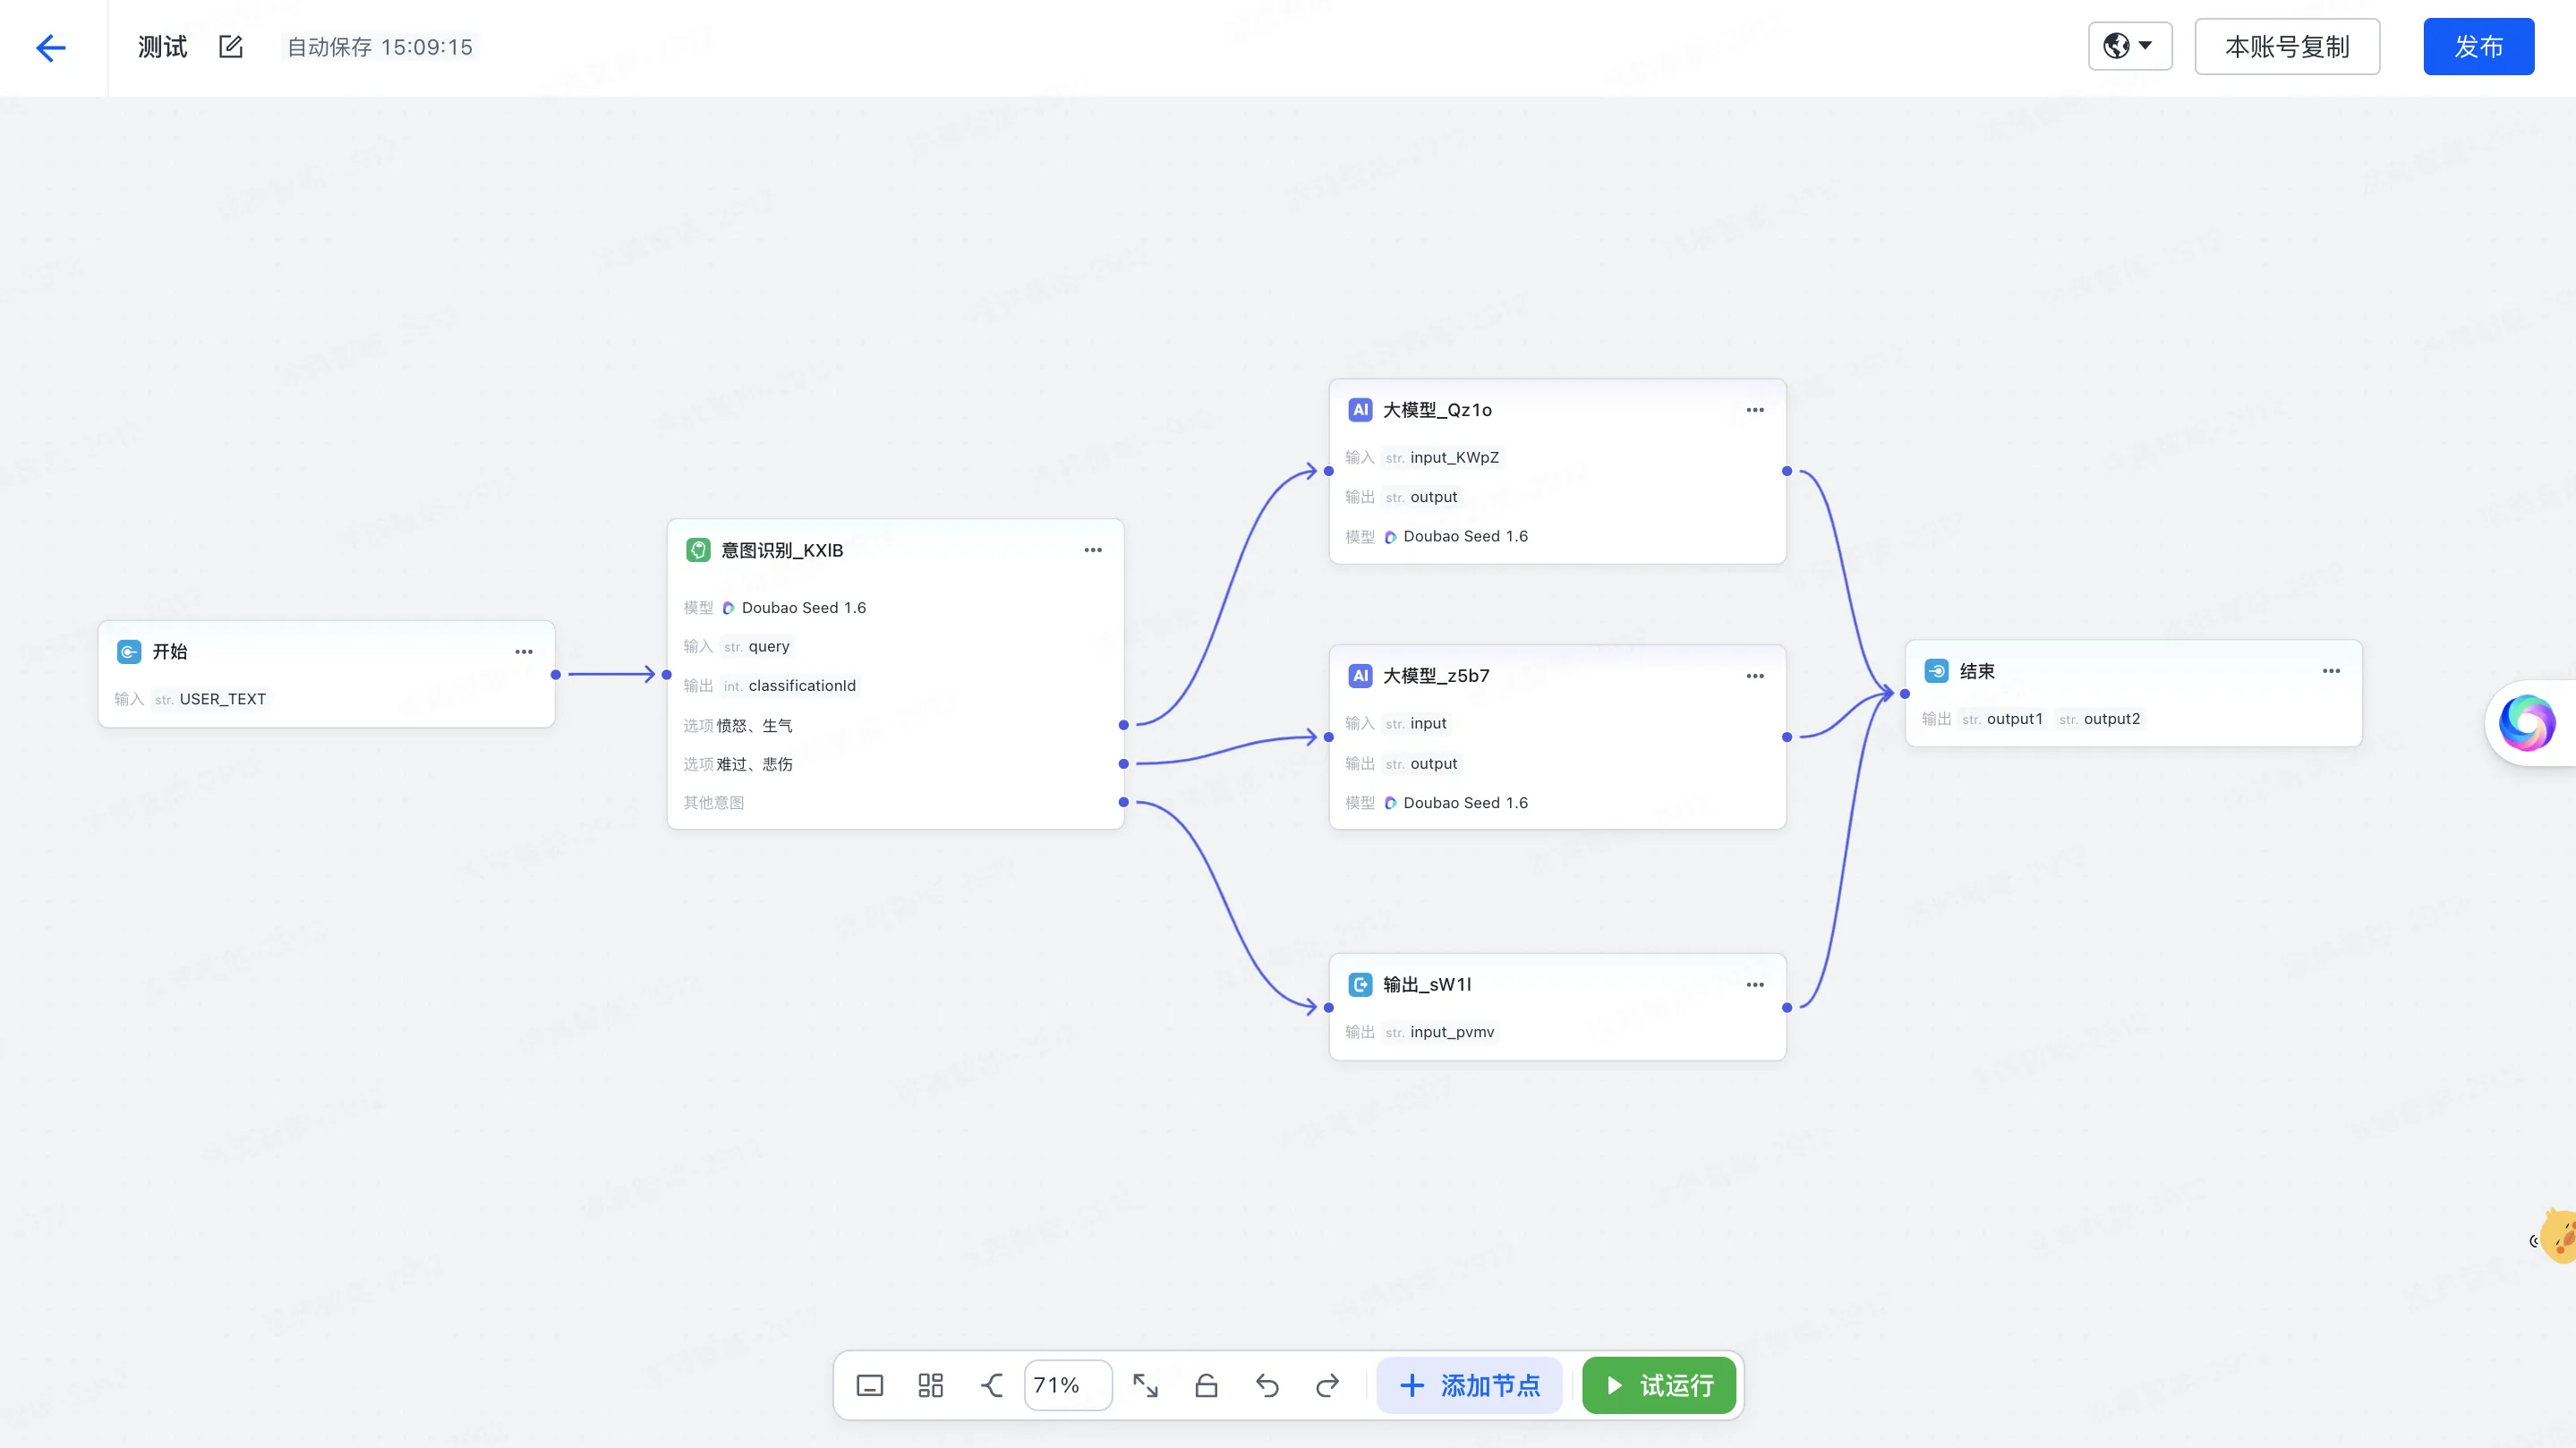
For the full Workflow development reference, see Workflow Management.
7. Publish and bind
After developing your Agent:
- Click Publish in the Agent editor.
- Select a version tag or use auto-versioning.
- Wait for deployment to complete.
Once published, the Agent is automatically bound to the product PID. Any device using that PID connects to your Agent.
Best practices: designing good Agent-enabled devices
The most successful Agent-hardware products follow these principles:
DP-first design
Define DPs that map to semantic device capabilities, not raw register values. An Agent understands target_temp better than register_0x12_value.
Human-readable DPCodes
Use descriptive names (hvac_mode, not dp5). The LLM uses DPCode names to understand what each DP does.
State before action
Give the Agent enough readable state to make good decisions. A thermostat Agent needs to know the current temperature before it can decide to heat or cool.
Idempotent actions
Device control DPs should be safe to write multiple times. The Agent may retry DP writes on network failure.
Think about modality
Does this device need voice? Vision? Both? Match your Agent mode and hardware capabilities to the use case.
For deeper product design guidance, see Agent-First Hardware Concepts.