🌈 LED Pixel Matrix Magic: Creating Stunning Visual Effects with TuyaOpen
This is series part-1 of lighting up a single-wire LED matrix. In future posts, we'll show how to turn this into a full IoT project!
🚀 About TuyaOpen
This project is built using TuyaOpen, an open-source AI+IoT development framework that helps developers quickly create smart connected devices. TuyaOpen supports multiple chip platforms and RTOS-like operating systems, seamlessly integrating multimodal AI capabilities including audio, video, and sensor data processing.
Key Features of TuyaOpen:
- Multi-Platform Support: T5AI, ESP32, LN882H, and more
- AI Integration: Voice recognition, LLM integration, and multimodal AI
- Cloud Connectivity: Seamless integration with Tuya Cloud services
- Cross-Platform Development: Support for C/C++, Arduino, Lua, and MicroPython
- Rich Peripheral Drivers: Comprehensive hardware abstraction layer
- Develop Projects With: MacOS/Windows/Linux Operating Systems.
📚 Learn More:
- Official Documentation: TuyaOpen Documentation
- GitHub Repository: TuyaOpen on GitHub
- Source Code: LED Pixel Matrix Example
- Community: Join the TuyaOpen community for support and collaboration
🎯 Project Overview
Welcome to the ultimate LED pixel matrix adventure! This tutorial will guide you through building an incredible 16x16 LED matrix display using the TuyaOpen SDK. We'll create everything from simple color effects to complex animations, scrolling text, and even mathematical patterns that will blow your mind!
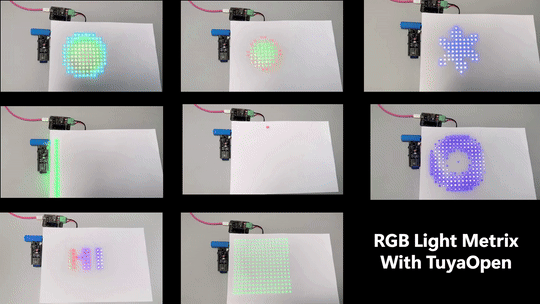
All animation effects running on the 16x16 LED matrix - from breathing colors to 2D waves, scrolling text, and more!
🚀 What You'll Build
By the end of this tutorial, you'll have created:
- 16x16 LED Matrix Display (256 individual addressable LEDs!)
- 8 Different Animation Effects including waves, ripples, and text scrolling
- Real-time Color Management with HSV to RGB conversion
- Custom Font Rendering for scrolling text messages
- Mathematical Pattern Generation using trigonometry and wave functions
🛠️ Hardware Requirements
Core Components
- Tuya T5AI Development Board (T5AI-Core or T5AI-Board)
- 16x16 WS2812B LED Matrix (256 LEDs total)
- Jumper Wires for connections
- 5V Power Supply (capable of 5V@3A+ for full brightness)
- Breadboard (optional, for prototyping)
🎯 T5AI Hardware Options
This demo is designed for the T5AI-Core development board, but all T5 Series boards are compatible. Choose the board that best fits your project needs:
T5AI-Core (Recommended for this project)
- Compact Design: Small form factor, perfect for breadboard prototyping
- 44-Pin Header: Easy connection to LED matrices and other peripherals
- Battery Management: Built-in lithium battery support
- Audio Capabilities: 2-channel microphone + 1-channel speaker
- Perfect for: LED projects, IoT prototypes, embedded development
📚 Hardware Documentation: T5AI-Core Overview
T5AI-Board (Full-featured option)
- Complete DevKit: Full development board with all features
- Optional LCD Screen: 3.5" touchscreen support
- Camera Module: DVP camera interface
- Rich I/O: 56 GPIO pins, multiple interfaces
- Perfect for: Complex projects, multimedia applications, AI development
📚 Hardware Documentation: T5AI-Board Overview
🛒 Where to Get Hardware
Official TuyaOpen Hardware Store: Get Hardware
🔌 Wiring Diagram
The beauty of this project lies in its simplicity - just one data wire controls all 256 LEDs!
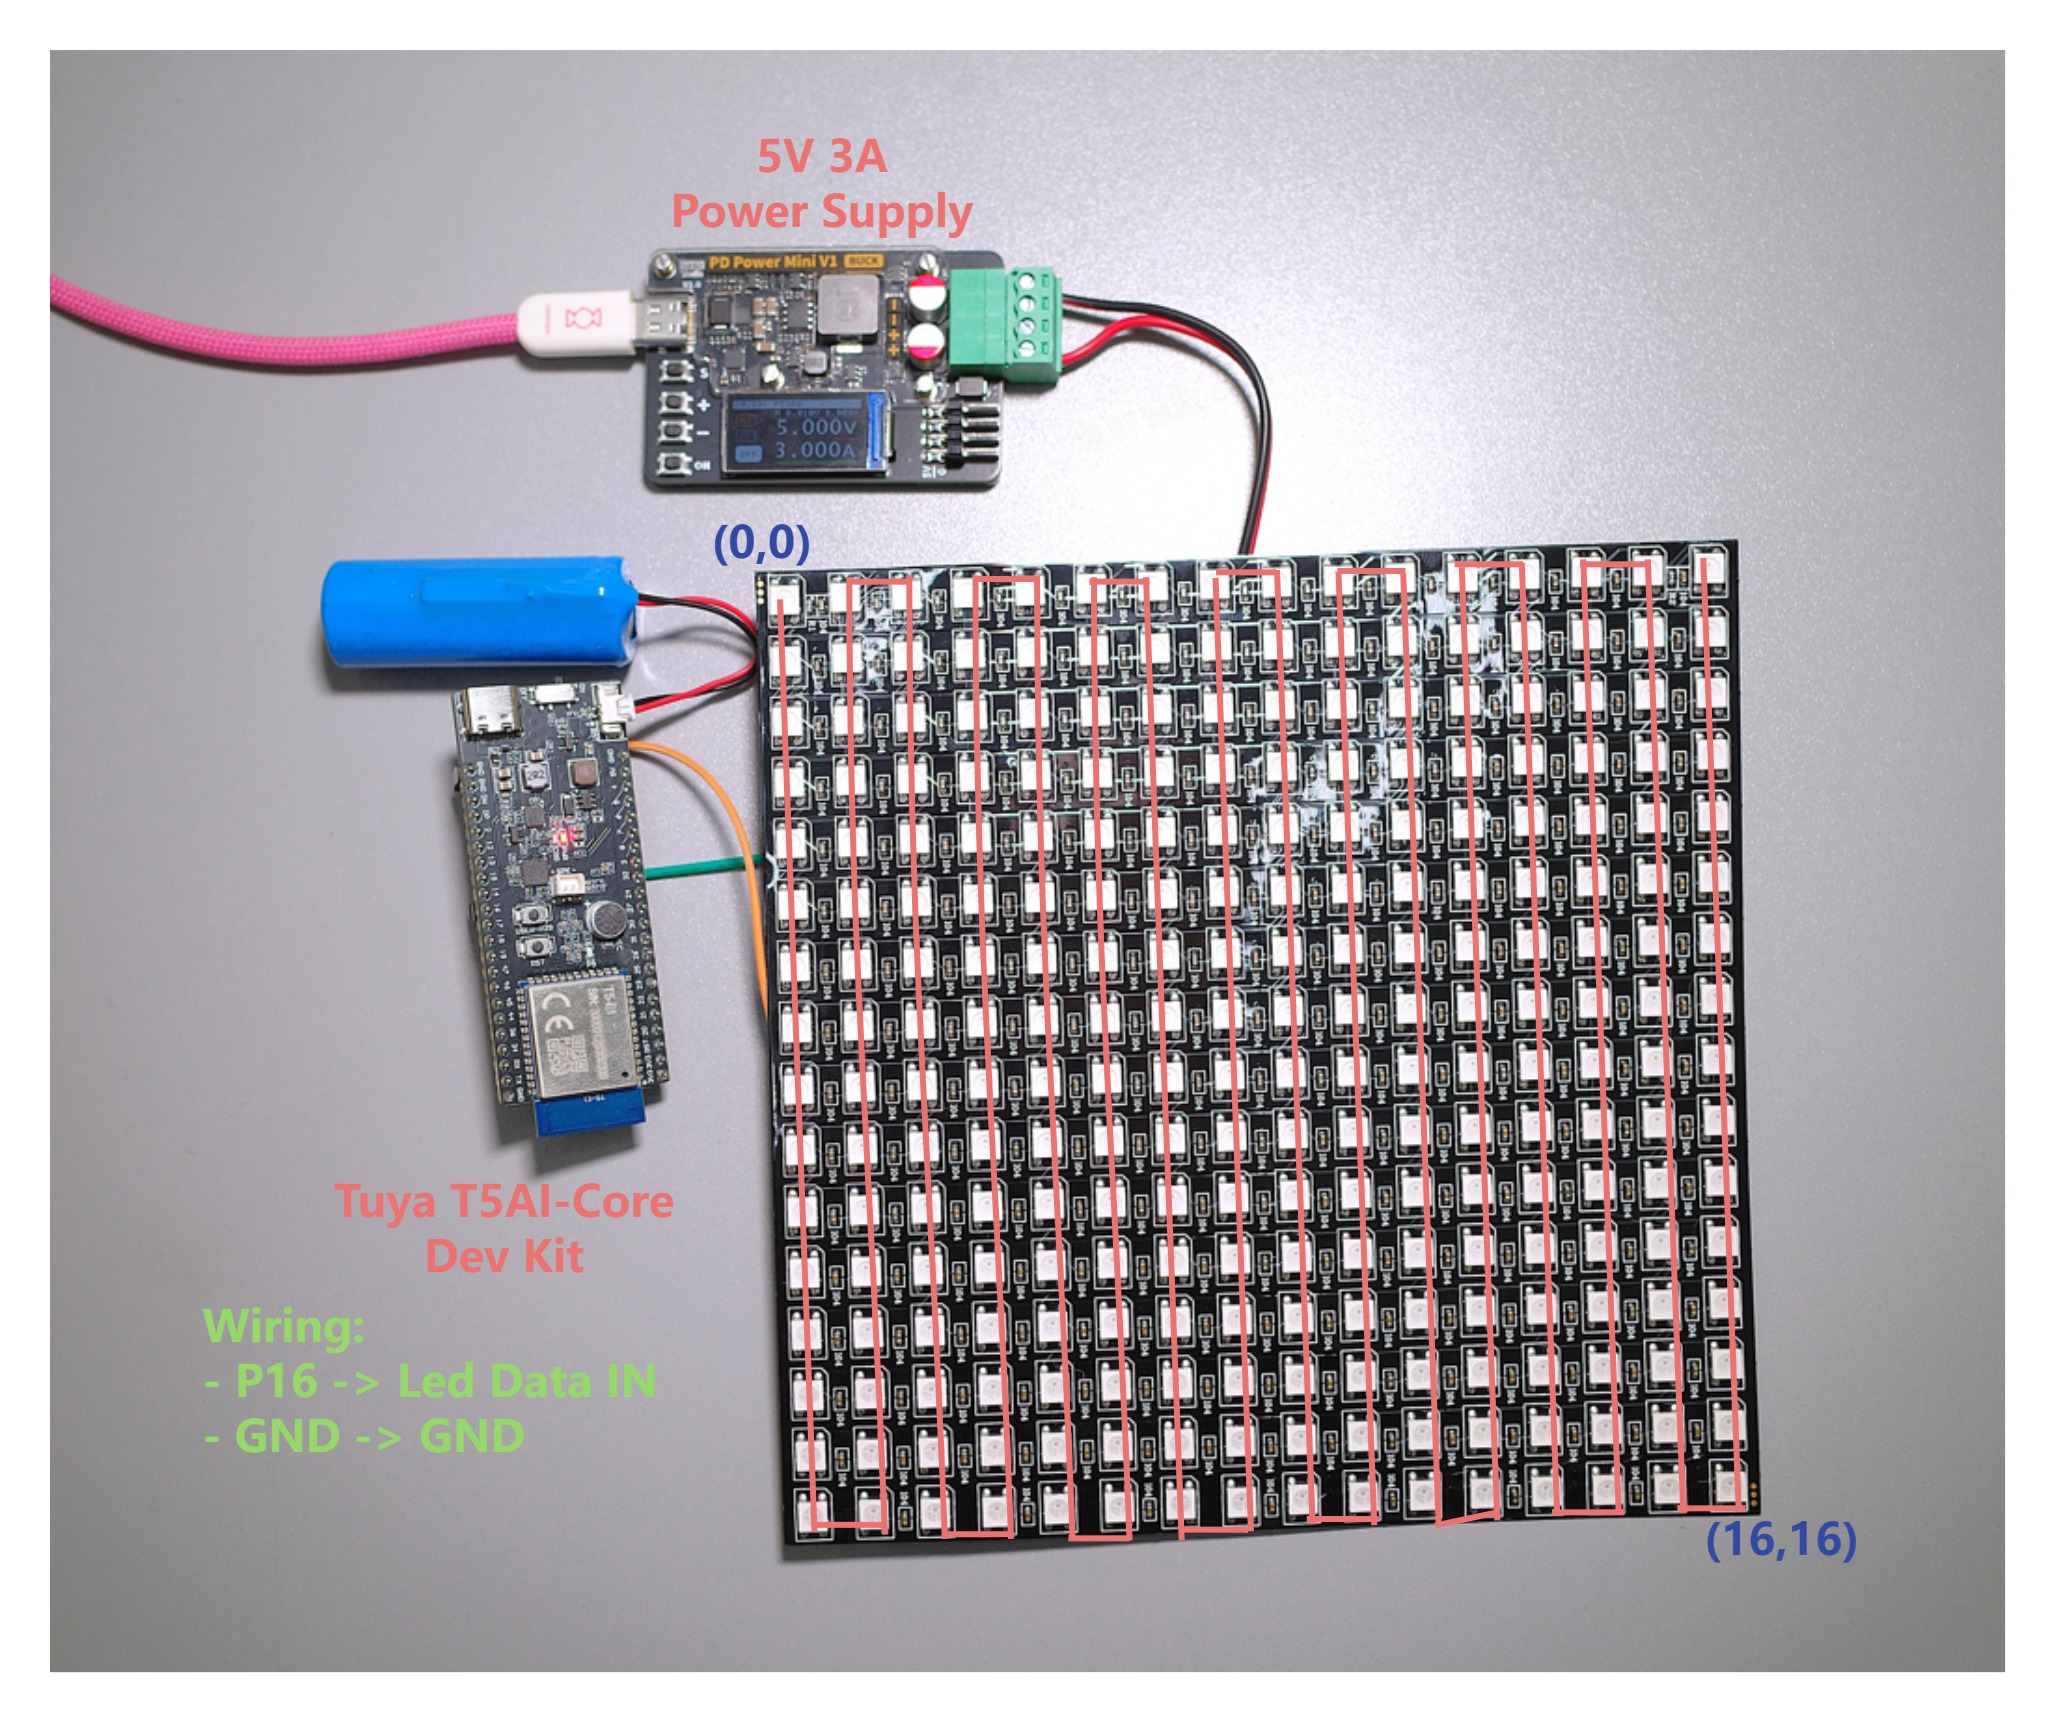
T5AI Core board connected to 16x16 LED matrix with coordinate system and wiring diagram
| T5AI Core Board Pin | LED Matrix Pin | External Power Supply |
|---|---|---|
| SPI0_MISO (P16) | Data In | |
| - | VCC | +5V |
| GND | GND | GND |
Important Notes:
- Connect the LED matrix data line to SPI0_MISO pin
- Use a separate 5V power supply for the LEDs (don't power from the board)
- Ensure proper grounding between power supply and board
💻 Software Architecture
Project Structure
leds-pixel/
├── src/
│   ├── example_led-pixels.c    # Main application logic
│   └── led_font.h             # 8x8 font database
├── include/
│   └── example_led-pixels.h   # Header definitions
├── config/
│   └── TUYA_T5AI_CORE.config  # Board configuration
└── CMakeLists.txt             # Build configuration
Key Components
1. LED Driver System
The project uses Tuya's pixel driver framework supporting multiple LED types:
- WS2812B (default)
- SK6812
- SM16703P
- YX1903B
2. Matrix Coordinate System
// 16x16 LED matrix layout with zigzag pattern
// Coordinates: (0,0) = top-left, (15,15) = bottom-right
// LED indexing follows column-based zigzag pattern
3. Color Management
- Resolution: 1000 levels per color channel
- Color Space: RGB + Warm/Cold white
- Effects: HSV to RGB conversion for smooth color transitions
🎨 Animation Effects Deep Dive
The LED matrix demo includes multiple stunning animation effects. Here are two key examples that showcase the mathematical and programming concepts behind the visual magic:
1. Breathing Color Effect
static void __breathing_color_effect(void)
{
OPERATE_RET rt = OPRT_OK;
PIXEL_COLOR_T current_color = {0};
uint32_t step = 20;
uint32_t max_cycles = 3;
uint32_t color_num = CNTSOF(cCOLOR_ARR);
// Static variables for frame-by-frame animation
static uint32_t static_intensity = 0;
static int32_t static_direction = 1;
static uint32_t static_cycle_count = 0;
static uint32_t static_color_index = 0;
static bool animation_complete = false;
// Reset animation if complete
if (animation_complete) {
static_intensity = 0;
static_direction = 1;
static_cycle_count = 0;
static_color_index = 0;
animation_complete = false;
}
// Single frame update
static_intensity += (static_direction * step);
if (static_intensity >= COLOR_RESOLUION) {
static_intensity = COLOR_RESOLUION;
static_direction = -1;
} else if (static_intensity <= 0) {
static_intensity = 0;
static_direction = 1;
static_cycle_count++;
static_color_index = (static_color_index + 1) % color_num;
if (static_cycle_count >= max_cycles) {
animation_complete = true;
}
}
current_color.red = (cCOLOR_ARR[static_color_index].red * static_intensity) / COLOR_RESOLUION;
current_color.green = (cCOLOR_ARR[static_color_index].green * static_intensity) / COLOR_RESOLUION;
current_color.blue = (cCOLOR_ARR[static_color_index].blue * static_intensity) / COLOR_RESOLUION;
current_color.warm = (cCOLOR_ARR[static_color_index].warm * static_intensity) / COLOR_RESOLUION;
current_color.cold = (cCOLOR_ARR[static_color_index].cold * static_intensity) / COLOR_RESOLUION;
TUYA_CALL_ERR_GOTO(tdl_pixel_set_single_color(sg_pixels_handle, 0, LED_PIXELS_TOTAL_NUM, ¤t_color), __ERROR);
TUYA_CALL_ERR_GOTO(tdl_pixel_dev_refresh(sg_pixels_handle), __ERROR);
__ERROR:
PR_ERR("breathing color effect error");
return;
}
What it does:
- Creates a smooth breathing effect across all LEDs
- Cycles through primary colors (red → green → blue)
- Uses intensity modulation for the "breathing" effect
- Demonstrates smooth color transitions and timing control
Technical Implementation:
- Intensity Modulation: Uses sine wave functions for smooth fade in/out
- Color Cycling: Transitions between predefined color arrays
- Frame Management: Static variables maintain animation state between frames
2. 2D Wave Effect
static void __2d_wave_effect(void)
{
    OPERATE_RET rt = OPRT_OK;
    PIXEL_COLOR_T tinted_color = {0};
    uint32_t max_cycles = 2;  // Reduced cycles to match other effects
    float max_radius = 11.0f; // Maximum radius to cover the 16x16 matrix
    float wave_speed = 0.5f;  // Faster wave speed for smoother transitions
    float color_saturation = 1.0f;
    float color_value = 1.0f;

    // Static variables for frame-by-frame animation
    static uint32_t static_cycle_count = 0;
    static float static_wave_radius = 0.0f;
    static float static_color_hue = 0.0f;
    static bool animation_complete = false;

    // Reset animation if complete
    if (animation_complete) {
        static_cycle_count = 0;
        static_wave_radius = 0.0f;
        static_color_hue = 0.0f;
        animation_complete = false;
    }

    // Clear LEDs for each frame
    PIXEL_COLOR_T off_color = {0};
    TUYA_CALL_ERR_GOTO(tdl_pixel_set_single_color(sg_pixels_handle, 0, LED_PIXELS_TOTAL_NUM, &off_color), __ERROR);

    // Calculate current wave radius
    static_wave_radius += wave_speed;
    if (static_wave_radius > max_radius) {
        static_wave_radius = 0.0f;
        static_cycle_count++;

        if (static_cycle_count >= max_cycles) {
            animation_complete = true;
        }
    }

    // Continuous color spectrum transition at center
    static_color_hue += 2.0f; // Faster color transition for smoother effect
    if (static_color_hue >= 360.0f) {
        static_color_hue = 0.0f;
    }

    // Base color from spectrum is calculated per LED in the loop below

    // Apply wave effect to each LED
    for (uint32_t y = 0; y < 16; y++) {
        for (uint32_t x = 0; x < 16; x++) {
            float distance = __distance_from_center(x, y);
            float angle = __calculate_angle(x, y);

            // Check if LED is within the expanding wave
            if (distance <= static_wave_radius) {
                // Calculate hue based on distance from center for constant color bands
                float distance_hue = (distance / max_radius) * 180.0f; // Reduced range for smoother transitions
                float current_hue = static_color_hue - distance_hue;   // Hue shifts based on distance
                if (current_hue < 0.0f)
                    current_hue += 360.0f;

                // Convert hue to RGB for constant color
                float h = current_hue / 60.0f;
                float c = color_value * color_saturation;
                float x_val = c * (1.0f - fabsf(fmodf(h, 2.0f) - 1.0f));
                float m = color_value - c;

                float r, g, b;
                if (h < 1.0f) {
                    r = c;
                    g = x_val;
                    b = 0;
                } else if (h < 2.0f) {
                    r = x_val;
                    g = c;
                    b = 0;
                } else if (h < 3.0f) {
                    r = 0;
                    g = c;
                    b = x_val;
                } else if (h < 4.0f) {
                    r = 0;
                    g = x_val;
                    b = c;
                } else if (h < 5.0f) {
                    r = x_val;
                    g = 0;
                    b = c;
                } else {
                    r = c;
                    g = 0;
                    b = x_val;
                }

                // Set constant color (no intensity fade)
                tinted_color.red = (uint32_t)((r + m) * COLOR_RESOLUION);
                tinted_color.green = (uint32_t)((g + m) * COLOR_RESOLUION);
                tinted_color.blue = (uint32_t)((b + m) * COLOR_RESOLUION);
                tinted_color.warm = 0;
                tinted_color.cold = 0;

                // Apply 8-directional tinting
                __apply_directional_tint(&tinted_color, angle, &tinted_color);

                // Set LED color
                uint32_t led_index = __matrix_coord_to_led_index(x, y);
                if (led_index > 0 && led_index <= LED_PIXELS_TOTAL_NUM) {
                    TUYA_CALL_ERR_GOTO(tdl_pixel_set_single_color(sg_pixels_handle, led_index, 1, &tinted_color),
                                       __ERROR);
                }
            }
        }
    }

    TUYA_CALL_ERR_GOTO(tdl_pixel_dev_refresh(sg_pixels_handle), __ERROR);
    // tal_system_sleep(30); // Removed - main loop controls timing // Faster refresh for smoother transitions

__ERROR:
    PR_ERR("2D wave effect error");
    return;
}
Mathematical Magic:
- Distance Calculation:
sqrt((x-7.5)² + (y-7.5)²)from matrix center - Wave Propagation: Expanding radius with time-based animation
- Color Tinting: 8-directional color variation based on angle
- HSV Color Space: Smooth color transitions using hue, saturation, value
- Trigonometric Functions: Uses
atan2()for angle calculation - Color Spectrum: Continuous hue rotation for rainbow effects
- Directional Tinting: Different colors based on compass direction
More Animation Effects
The demo codebase includes several additional animation effects that showcase different programming techniques:
- Scrolling Text: 8x8 font rendering with rainbow colors
- Ripple Effect: Water-like ripples using sine wave mathematics
- Snowflake Pattern: 6-fold rotational symmetry with mathematical precision
- Scan Animation: Column and row scanning patterns
- Breathing Circle: Pulsing circular patterns with color cycling
- Running Light: Sequential LED activation with color transitions
- Color Wave: Traveling wave effects across the matrix
Each effect demonstrates different aspects of embedded programming, from basic LED control to advanced mathematical algorithms for visual effects.
🔧 Code Walkthrough
Matrix Coordinate Conversion
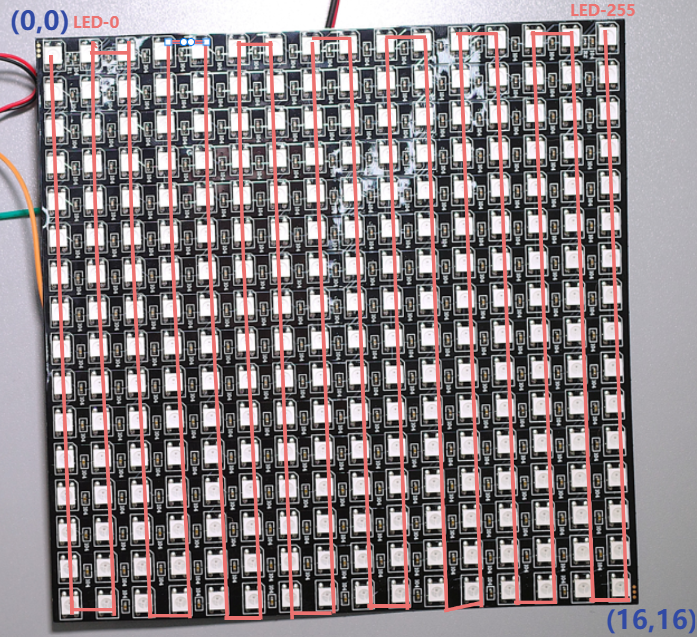
The LED matrix is physically a 2D grid (16x16), but the LEDs are wired in a single chain, so you need a way to convert (x, y) coordinates to the correct 1D LED index. This is handled by the __matrix_coord_to_led_index function.
Zigzag (Serpentine) Mapping Explained
- Even Columns (x % 2 == 0):
The LEDs in even-numbered columns are wired from top to bottom.- The index is calculated as:
index = x * 16 + y
- The index is calculated as:
- Odd Columns (x % 2 == 1):
The LEDs in odd-numbered columns are wired from bottom to top.- The index is calculated as:
index = (x + 1) * 16 - 1 - y
- The index is calculated as:
This pattern ensures that the logical (x, y) coordinates always map to the correct physical LED, regardless of the wiring direction in each column.
Example:
- (x=0, y=0) → index 0 (top-left)
- (x=0, y=15) → index 15 (bottom of first column)
- (x=1, y=0) → index 31 (top of second column, since it's reversed)
- (x=1, y=15) → index 16 (bottom of second column)
This mapping is essential for displaying images, animations, or text correctly on the matrix, as it abstracts away the physical wiring and lets you work with (x, y) coordinates naturally in your code.
static uint32_t __matrix_coord_to_led_index(uint32_t x, uint32_t y)
{
    // Convert 2D matrix coordinates to 1D LED index
    // Handles zigzag pattern for proper LED addressing
    if (x % 2 == 0) {
        // Even column: top to bottom
        led_index = (x * 16 + y);
    } else {
        // Odd column: bottom to top
        led_index = (x + 1) * 16 - 1 - y;
    }
    return led_index;
}
Color Management
// HSV to RGB conversion for smooth color transitions
float h = hue / 60.0f;
float c = saturation * value;
float x = c * (1.0f - fabsf(fmodf(h, 2.0f) - 1.0f));
// ... RGB calculation based on hue sector
Animation State Management
// Frame-by-frame animation using static variables
static uint32_t frame_count = 0;
static float wave_radius = 0.0f;
static bool animation_complete = false;

// Reset animation when complete
if (animation_complete) {
    frame_count = 0;
    wave_radius = 0.0f;
    animation_complete = false;
}
🎛️ Configuration & Customization
LED Driver Selection
// Choose your LED type by uncommenting the appropriate driver
TUYA_CALL_ERR_RETURN(tdd_ws2812_driver_register(device_name, &dev_init_cfg));
// TUYA_CALL_ERR_RETURN(tdd_sk6812_driver_register(device_name, &dev_init_cfg));
// TUYA_CALL_ERR_RETURN(tdd_sm16703p_driver_register(device_name, &dev_init_cfg));
Effect Customization
// Modify effect parameters
#define LED_PIXELS_TOTAL_NUM 256    // Total LED count
#define LED_CHANGE_TIME      800    // Effect timing (ms)
#define COLOR_RESOLUION      1000u  // Color depth
Animation Timing
// Adjust animation speed and duration
static uint32_t max_cycles_per_effect = 200;  // Effect duration
tal_system_sleep(50);  // Frame delay (ms)
🚀 Building & Flashing
Prerequisites
Before building this project, you'll need to set up the TuyaOpen development environment. Follow the official setup guide for detailed instructions:
📚 Environment Setup Guide: TuyaOpen Environment Setup
Quick Setup Commands
# Install required tools (Ubuntu/Debian)
sudo apt-get install lcov cmake-curses-gui build-essential ninja-build wget git python3 python3-pip python3-venv libc6-i386 libsystemd-dev

# Clone TuyaOpen repository
git clone https://github.com/tuya/TuyaOpen.git
cd TuyaOpen

# Activate tos.py environment
. ./export.sh

# Verify installation
tos.py version
tos.py check
Project Compilation
📚 Compilation Guide: TuyaOpen Project Compilation
Step 1: Navigate to Project
cd examples/peripherals/leds-pixel
Step 2: Configure Project
# Configure for T5AI board
tos.py config choice
# Select: T5AI.config
Step 3: Build Project
# Build the project
tos.py build
Step 4: Clean Build (if needed)
# Clean build cache
tos.py clean

# Deep clean
tos.py clean -f
Firmware Flashing
📚 Flashing Guide: TuyaOpen Firmware Burning
Prerequisites
- Connect T5AI board to PC via USB
- For Linux/Mac users:
sudo usermod -aG dialout $USER(then restart) - For Windows: Install appropriate USB drivers
Flashing Process
# Flash firmware to device
tos.py flash

# Select the correct serial port when prompted
# T5AI boards typically have two ports:
# - Lower number: Programming port
# - Higher number: Logging port
Monitor Output
# Monitor serial output for debugging
tos.py monitor
Configuration Options
🎪 Advanced Effects & Modifications
Creating Custom Effects
static void __custom_effect(void)
{
    // Your custom animation logic here
    // Use the matrix coordinate system
    // Apply color mathematics
    // Refresh display
}
Adding New Characters
// Extend the font database in led_font.h
{'@', {0x00, 0x3C, 0x66, 0x6E, 0x6A, 0x6E, 0x60, 0x3C}, 8},
Performance Optimization
- Frame Rate: Adjust
tal_system_sleep()for desired FPS - Color Depth: Modify
COLOR_RESOLUIONfor brightness levels - Memory Usage: Optimize static variables for RAM efficiency
🔍 Troubleshooting
Common Issues
LEDs Not Lighting Up
- Check Power: Ensure 5V supply can handle full load
- Data Connection: Verify SPI0_MISO connection
- Ground Connection: Ensure common ground between board and LED matrix
Flickering or Unstable Display
- Power Supply: Insufficient current capacity
- Timing Issues: Adjust frame delay timing
- Signal Quality: Check for loose connections
Color Issues
- RGB Order: Verify
RGB_ORDERconfiguration - Brightness: Check
COLOR_RESOLUIONsetting - Driver Selection: Ensure correct LED type selected
🌟 Project Extensions - What to Build Next?
IoT Integration
- Tuya Cloud: Connect to Tuya IoT platform
- Remote Control: Control effects via mobile app
- Scheduling: Time-based effect switching
Advanced Patterns
- Game of Life: Cellular automaton simulation
- Fractal Patterns: Mandelbrot set visualization
- Audio Visualization: Real-time audio reactive effects
Hardware Upgrades
- Larger Matrix: Scale to 32x32 or 64x64
- Multiple Panels: Chain multiple matrices
- 3D Effects: Add depth with layered displays
🎉 Conclusion
Congratulations! You've built an incredible LED matrix display system that demonstrates the power of embedded programming, mathematical algorithms, and creative engineering. This project showcases:
- Advanced Animation Techniques: From simple color changes to complex wave patterns
- Mathematical Modeling: Using trigonometry and wave functions for visual effects
- Hardware Integration: Seamless communication between microcontroller and LED matrix
- Creative Programming: Turning mathematical concepts into stunning visual art
What's Next?
- Experiment with your own custom effects
- Integrate with IoT platforms for remote control
- Scale up to larger matrices for even more impressive displays
- Share your creations with the maker community!
Happy Making! 🌈✨ Built with ❤️ using TuyaOpen SDK