Getting Started: First Flash
This page walks you from "I just downloaded the app" all the way to "I flashed my first device." The path is linear — read it in order and you will complete your first flash, typically in 5–10 minutes.
If you have never flashed firmware before, read Concepts first.
Prerequisites
Before you start, confirm everything on this checklist is ready — flashing needs both hardware and software, and none of it is optional.
- A supported device. tyutool targets Tuya ecosystem IoT devices; for the exact supported chip models see the firmware flash page.
- A USB-to-serial adapter. Connect it to the device's UART (TX/RX/GND, and power if needed). Wiring must be crossed: your computer's TX goes to the device's RX, and vice versa.
- The device in download/flash mode. Different devices enter this mode in different ways (button combinations, shorted solder pads, power-on timing).
Wiring and how to enter download mode are device-specific — there is no universal procedure. Check your device's manual or the FAQ first. tyutool cannot switch a device into download mode for you; you must do it manually. When the device is not in download mode, tyutool will keep waiting for the handshake and eventually time out. See Concepts for the relevant terms (UART / download mode / baud rate).
Download and install
tyutool ships pre-built installers for Windows, macOS, and Linux. Go to the project README's download table, pick the build for your OS, and install it the usual way. Common platform pitfalls (full details in the FAQ):
macOS forbids normal users from accessing serial devices by default. Add your user to the dialout group, then log out and back in for it to take effect:
sudo dseditgroup -o edit -a $USER -t user dialout
See the FAQ for more.
On some Linux desktops tyutool starts with an empty, unrendered window. Work around it by setting this environment variable before launch:
WEBKIT_DISABLE_COMPOSITING_MODE=1 ./tyutool-gui_linux_x86_64_appimage_x.x.x.AppImage
See the FAQ for more.
These snags are environment problems, unrelated to tyutool itself; once solved they tend to stay solved.
First launch
Once installed, start tyutool. The main window has two parts: a navigation sidebar on the left and the workspace for the active feature on the right. The sidebar has four main entries:
- Flash (firmware flashing) — flash, read, and erase the flash chip.
- Serial Debug — send and receive serial data in real time and inspect device logs.
- Toolbox — a collection of auxiliary tools.
- Settings — configure paths, log levels, and other application options.
The rest of this page all happens on the Flash page — the only entry point you need to care about for your first flash.
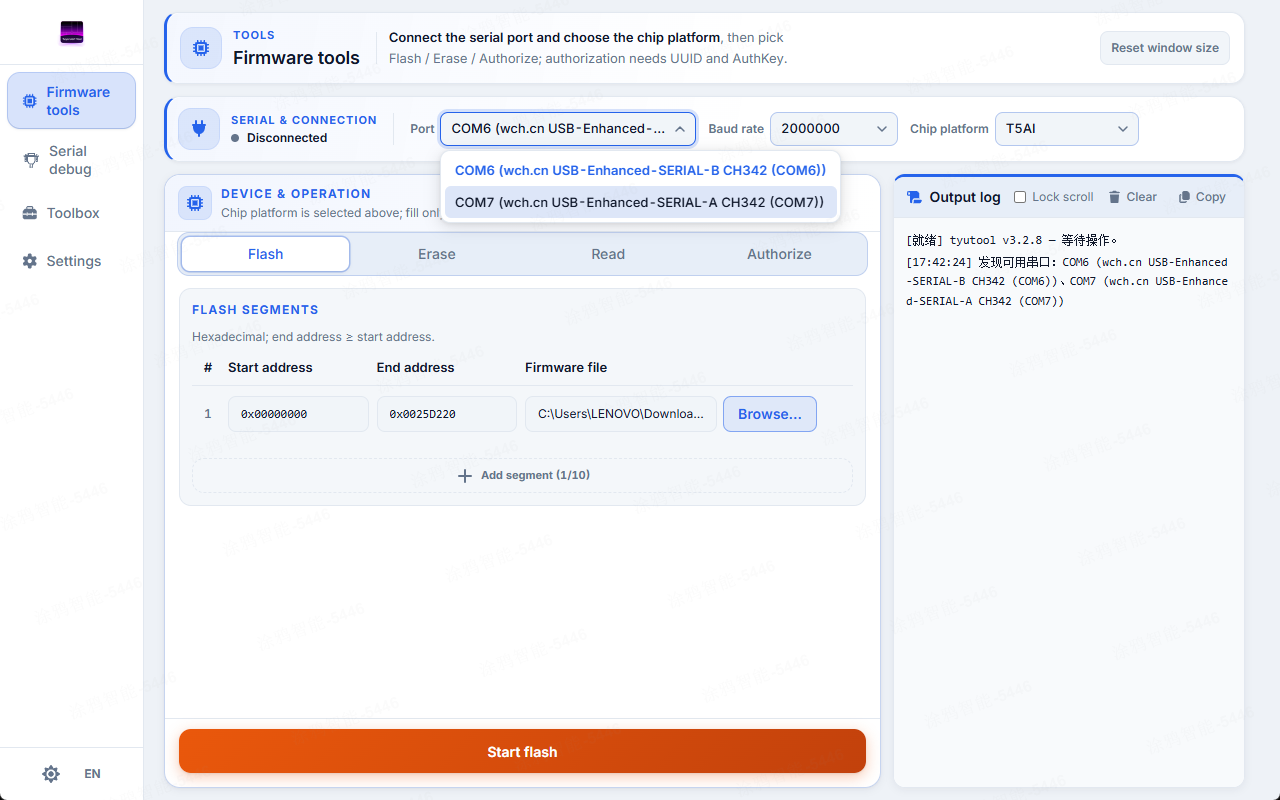
tyutool main window on the Flash page, with the serial dropdown open and showing detected ports.
Connect the device
Once the wiring is checked and the device is in download mode, build the connection in tyutool in this order:
- Plug the USB-to-serial adapter into your computer's USB port.
- On the Flash page, click the serial dropdown.
- Select your adapter from the listed ports (e.g.
COM3//dev/ttyUSB0//dev/cu.SLAB_USBtoUART). - Watch the status dot next to it: green means connected and ready; gray or red means not connected or handshake failed.
After you pick a port, tyutool auto-fills the recommended baud rate and chip model — you can accept them as-is. Higher is faster but more prone to failure; lower is slower but steadier. See Firmware Flash.
If no ports show in the dropdown, first confirm the adapter is plugged in and its driver is installed (CH340/CP2102/FT232), and check your macOS/Linux serial access permissions (see the installation notes above).
Complete your first flash
Once the device is connected, the flash itself is short. Walk these steps in order to write your first firmware:
- Select the chip model. At the top of the Flash page, pick the chip that matches your device — the model decides the communication protocol and address layout, and picking the wrong one fails the flash.
- Select firmware. Switch to the Flash tab, click to choose a firmware file, and pick a
.binfirmware. - Confirm the address. After you pick firmware, the write address is auto-filled to a default and usually needs no change.
- Start flashing. Click the Flash button to begin writing.
- Watch progress. Keep an eye on the progress bar and the log below; it should advance steadily to 100%.
- Wait for reboot. When writing finishes, the device reboots automatically and runs the new firmware — your first flash is complete.
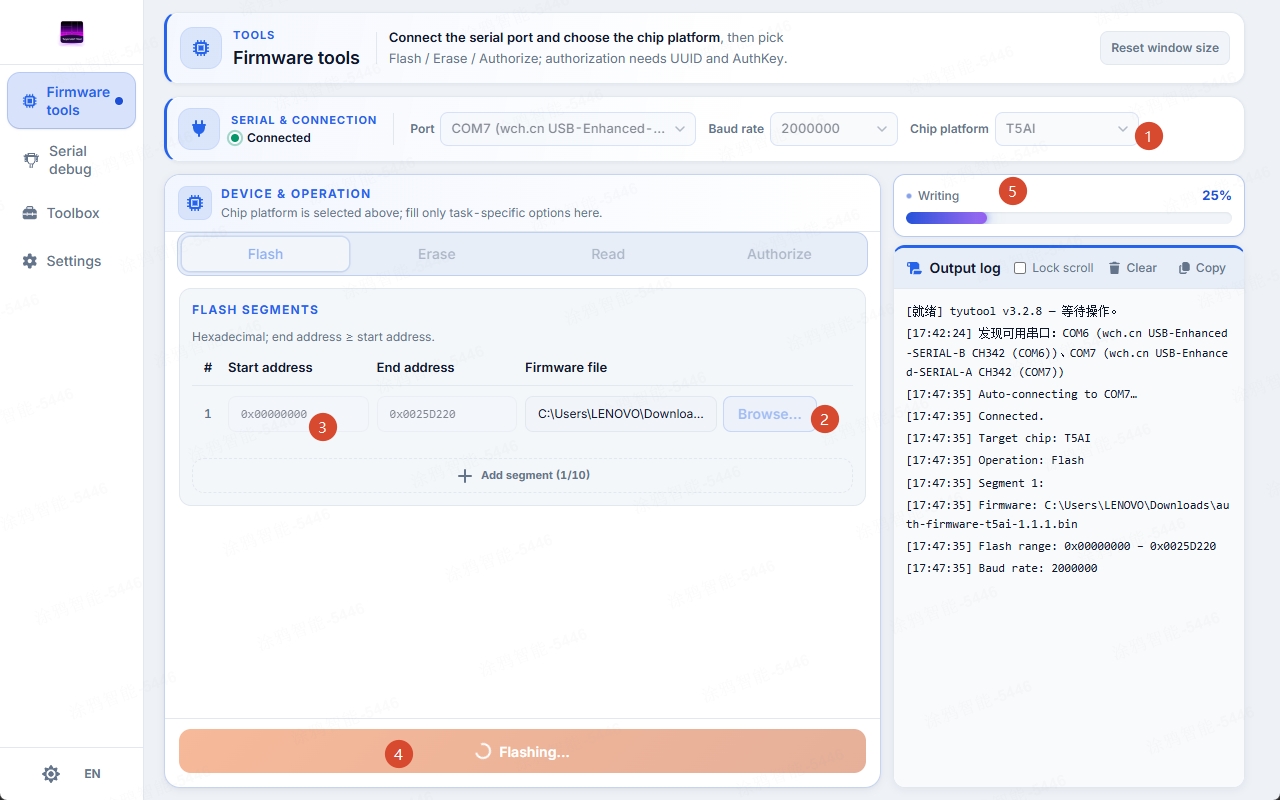
Flash page mid-flash — chip and firmware selected, port connected, and the flash in progress at 25%, with numbered callouts matching the steps above.
For the advanced options at each step (address tweaking, erase strategy, verification, saving logs, etc.), see the Firmware Flash page.
While flashing, never unplug the USB cable or cut power — you may corrupt the data. If a flash fails, first drop to 115200 baud and retry; if it still fails, see the FAQ.
Next steps
Congratulations on your first flash! From here, dive into each feature page as needed: