♡ LED 픽셀 매트릭스 매직: TuyaOpen의 놀라운 시각 효과를 창출
- 이것은 단 하나 철사 LED 모체를 점화의 시리즈 부분 1입니다. 향후 게시물에서 우리는이 전체 IoT 프로젝트로 전환하는 방법을 보여줄 것입니다!*
♨ TuyaOpen 소개
이 프로젝트는 **TuyaOpen **, 오픈 소스 AI + IoT 개발 프레임 워크는 Tuya의 스마트 연결 장치를 강화합니다. 그것은 여러 칩 플랫폼에 걸쳐 멀티 모달 AI를 통합 - 오디오, 비디오, 센서 처리 - RTOS 같은 시스템 서비스와 함께.
** TuyaOpen의 키 기능 : **
- ** 다중 플랫폼 지원 **: T5AI, ESP32, LN882H, 그리고 더 많은 것
- AI 통합: 음성 인식, LLM 통합 및 다중화 AI
- Cloud Connectivity: Tuya Cloud 서비스와의 원활한 통합
- Cross-Platform Development: C/C++, Arduino, Lua 및 MicroPython 지원
- **Rich Peripheral 드라이버 **: 포괄적인 하드웨어 요약 층
- **로 프로젝트 개발 **: MacOS/Windows/Linux 운영 체제.
** 더보기:**
- ** 공식 문서**:TuyaOpen 문서
- **GitHub 저장소 **:Tuya GitHub에서 열기
- 소스 코드:LED 화소 모체 보기
- ** 커뮤니티**: 지원 및 협업을 위한 TuyaOpen 커뮤니티에 가입
프로젝트 개요
8개의 애니메이션 효과를 실행하는 16x16 (256-LED) WS2812B 매트릭스를 구축 - 색상, 2D 파, 스크롤 텍스트, 리플 및 TuyaOpen SDK를 가진 T5AI-Core 보드에. 하나의 데이터 와이어는 전체 디스플레이를 구동합니다. 이 부분 1은 하드웨어가 설치 및 애니메이션 코드를 커버하며 클라우드 및 IoT 통합이 나중에 포함되었습니다.
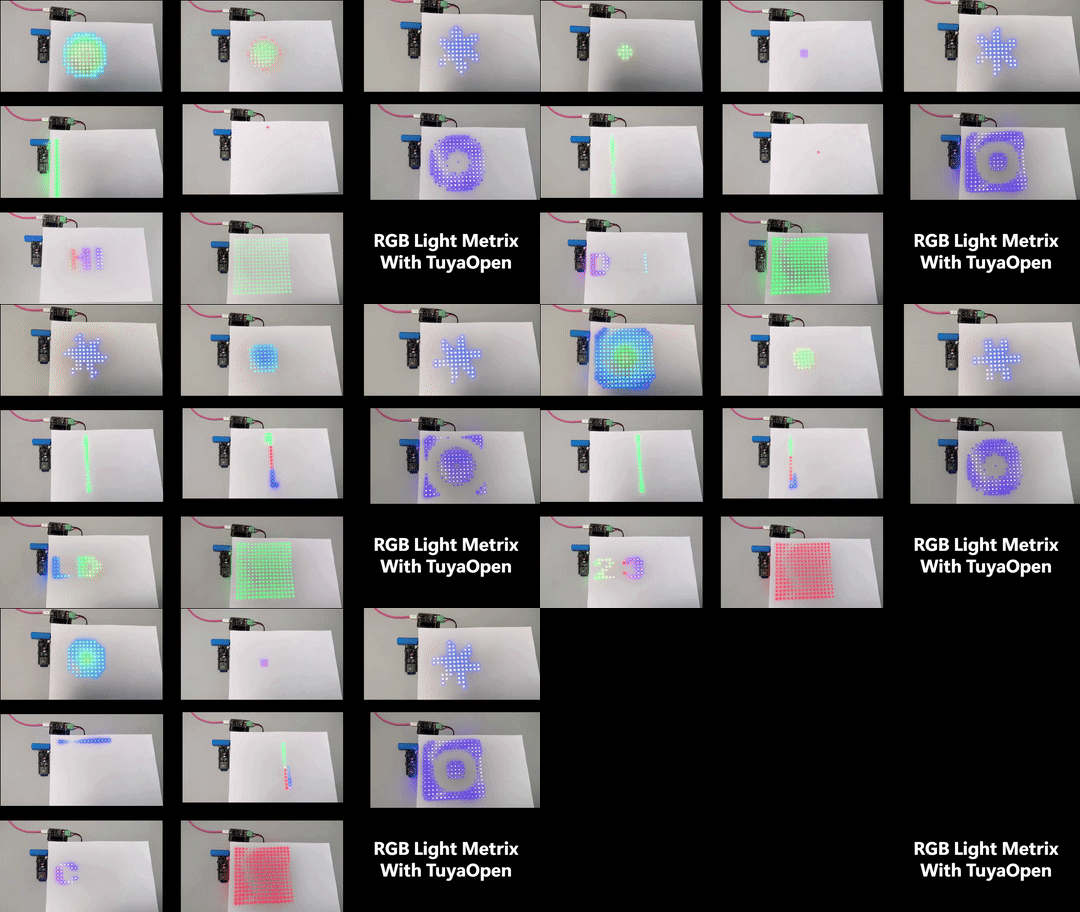
- 16x16 LED 매트릭스에서 실행되는 모든 애니메이션 효과 - 2D 파, 스크롤 텍스트 및 더! *
♨ 너를 짓는 것
이 튜토리얼의 끝에, 당신은 만들 것이다:
- ** 16x16 LED 매트릭스 디스플레이 ** (256 개별 주소 LED!)
- **8 다른 애니메이션 효과 ** 파, 리플 및 텍스트 스크롤 포함
- ** 실시간 컬러 관리** HSV로 RGB 변환
- Custom Font Rendering 텍스트 메시지 스크롤
- ** 수학 패턴 생성 ** trigonometry 및 파 기능을 사용하여
542️ 하드웨어 요구 사항
핵심 부품
- **Tuya T5AI 개발 보드 ** (T5AI-Core 또는 T5AI-Board)
- ** 16x16 WS2812B LED 매트릭스 ** (256 LED 총)
- **Jumper Wires ** 연결
- ** 5V 전원 공급** (풀 밝기를 위한 5V@3A+의 휴대용)
- Breadboard (선택 사항, 프로토 타이핑)
T **T5AI 하드웨어 옵션 **
이 데모는 ** T5AI-Core** 개발 보드를 위해 설계되었지만 모든 T5 시리즈 보드는 호환됩니다. 프로젝트에 적합한 보드를 선택하십시오.
T5AI-Core (이 프로젝트의 권장)
- **컴팩트 디자인 **: 작은 폼 팩터, 밀가루 반죽에 완벽
- ** 44 핀 헤더 **: LED 모조 및 기타 주변 장치에 쉽게 연결
- ** 배터리 관리 **: 내장 리튬 배터리 지원
- Audio Capabilities: 2채널 마이크 + 1채널 스피커
- **: LED 프로젝트, IoT 프로토 타입, 임베디드 개발
** 하드웨어 문서**:T5AI-Core 개요
T5AI-Board (전체 기능 옵션)
- **Complete DevKit **: 모든 기능을 갖춘 전체 개발 보드
- ** 선택적인 LCD 스크린 **: 3.5" 터치스크린 지원
- ** 사진기 단위 **: DVP 사진기 공용영역
- ** 리치 I / O ** : 56 GPIO 핀, 여러 인터페이스
- **Perfect **: 복잡한 프로젝트, 멀티미디어 애플리케이션, AI 개발
** 하드웨어 문서**:T5AI-Board 개요
Wh ** 하드웨어를 얻기 위해 **
** 공식 TuyaOpen 하드웨어 스토어 **:하드웨어
다이어그램
이 프로젝트의 아름다움은 단순성에 있습니다. ** 하나의 데이터 와이어 ** 모든 256 LED를 제어!
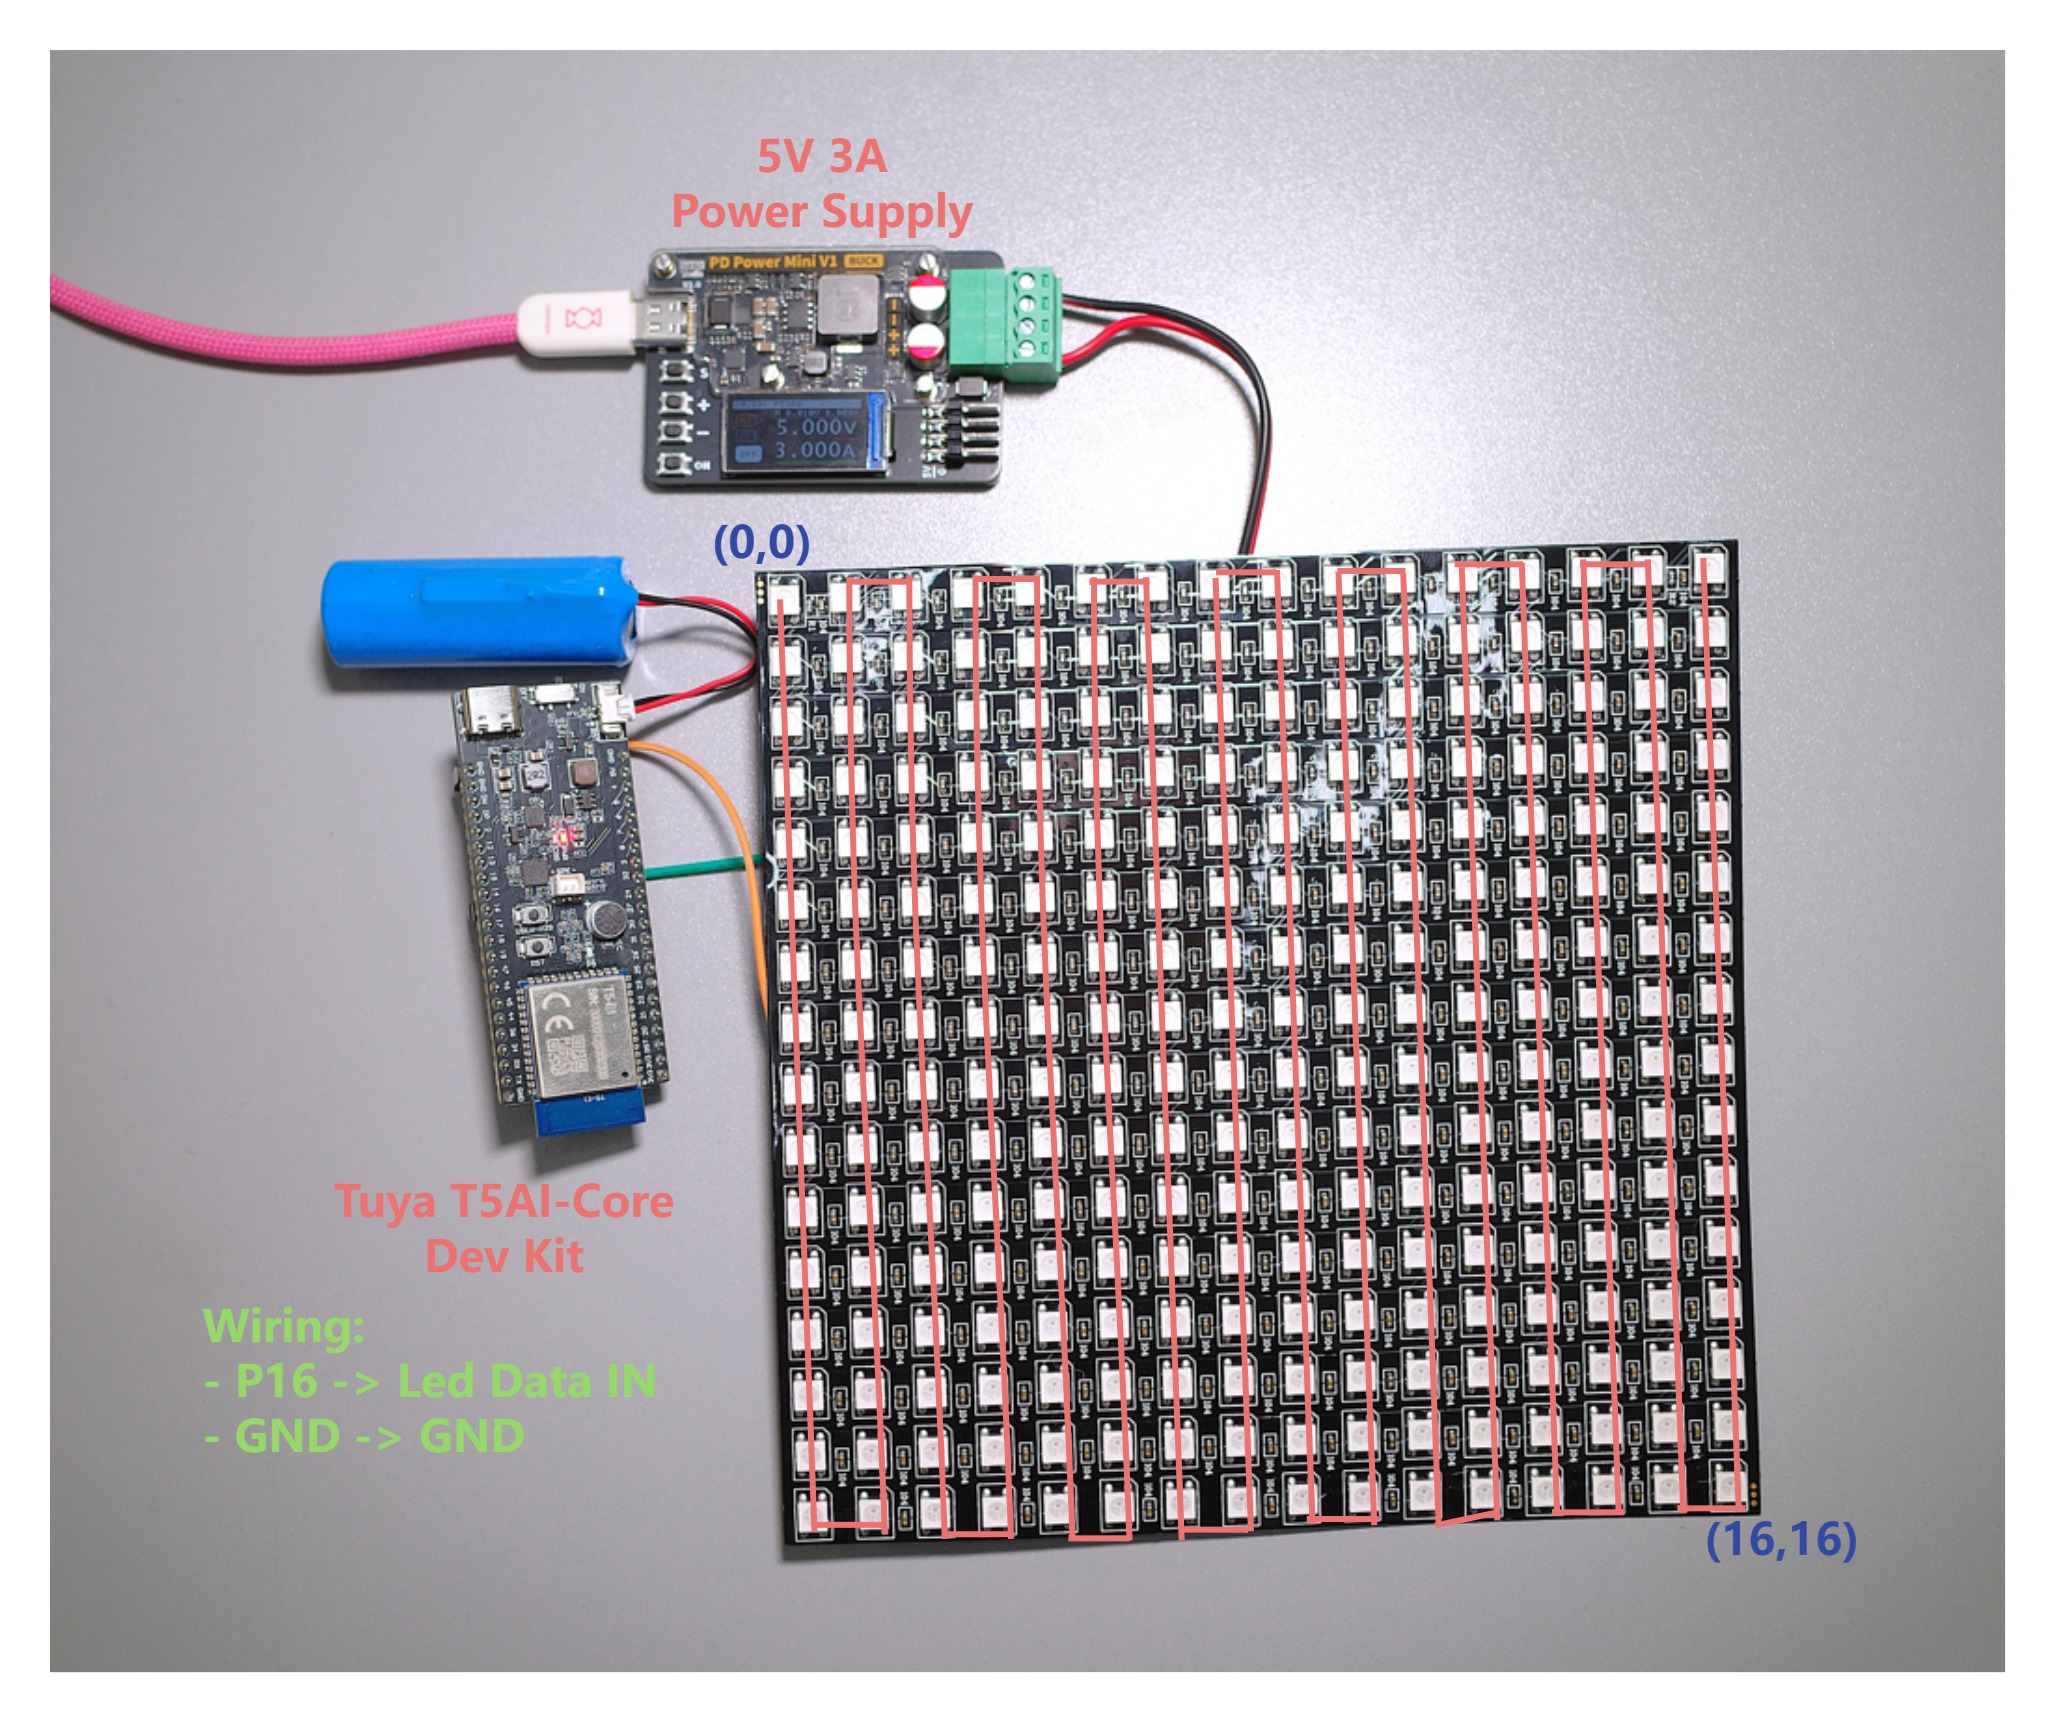
T5AI 핵심 널은 협조 체계와 배선 다이어그램을 가진 16x16 LED 모체에 연결했습니다
| T5AI 핵심 널 Pin | LED 모체 핀 | 외부 전력 공급 |
|---|---|---|
| SPI0 MISO (P16)를 사용하는 경우 | 데이터에 | |
| - | VCC 소개 | +5V를 |
| 사이트맵 | 사이트맵 | 사이트맵 |
** 중요 노트:**
- SPI0 MISO 핀에 LED 매트릭스 데이터 라인을 연결
- LED를 위한 분리되는 5V 전력 공급을 사용하십시오 (보드에서 힘 아닙니다)
- 전력 공급과 널 사이에서 적당한 지상에 놓기
소프트웨어 아키텍처
프로젝트 구조
leds-pixel/
├── src/
│   ├── example_led-pixels.c    # Main application logic
│   └── led_font.h             # 8x8 font database
├── include/
│   └── example_led-pixels.h   # Header definitions
├── config/
│   └── TUYA_T5AI_CORE.config  # Board configuration
└── CMakeLists.txt             # Build configuration
주요 성분
1. ** LED 드라이버 시스템 **
프로젝트는 Tuya의 픽셀 드라이버 프레임 워크를 사용하여 여러 LED 유형 :
- WS2812B (과태)
- 사이트맵
- 사이트맵
- 모델 번호: YX1903B
2. **Matrix 좌표계 **
// 16x16 LED matrix layout with zigzag pattern
// Coordinates: (0,0) = top-left, (15,15) = bottom-right
// LED indexing follows column-based zigzag pattern
3. ** 색상 관리 **
- ** 해결책 **: 색깔 수로 당 1000 수준
- ** 색상 공간 ** : RGB + 따뜻한 / 금 흰색
- Effects: 매끄러운 색깔 전환을 위한 HSV에 RGB 변환
♂ 애니메이션 효과 Deep Dive
LED matrix 데모에는 여러 멋진 애니메이션 효과를 포함합니다. 여기에 두 가지 핵심 예제는 시각적 마법 뒤에 수학 및 프로그래밍 개념을 보여줍니다.
1.Breathing 색상 효과
static void __breathing_color_effect(void)
{
OPERATE_RET rt = OPRT_OK;
PIXEL_COLOR_T current_color = {0};
uint32_t step = 20;
uint32_t max_cycles = 3;
uint32_t color_num = CNTSOF(cCOLOR_ARR);
// Static variables for frame-by-frame animation
static uint32_t static_intensity = 0;
static int32_t static_direction = 1;
static uint32_t static_cycle_count = 0;
static uint32_t static_color_index = 0;
static bool animation_complete = false;
// Reset animation if complete
if (animation_complete) {
static_intensity = 0;
static_direction = 1;
static_cycle_count = 0;
static_color_index = 0;
animation_complete = false;
}
// Single frame update
static_intensity += (static_direction * step);
if (static_intensity >= COLOR_RESOLUION) {
static_intensity = COLOR_RESOLUION;
static_direction = -1;
} else if (static_intensity <= 0) {
static_intensity = 0;
static_direction = 1;
static_cycle_count++;
static_color_index = (static_color_index + 1) % color_num;
if (static_cycle_count >= max_cycles) {
animation_complete = true;
}
}
current_color.red = (cCOLOR_ARR[static_color_index].red * static_intensity) / COLOR_RESOLUION;
current_color.green = (cCOLOR_ARR[static_color_index].green * static_intensity) / COLOR_RESOLUION;
current_color.blue = (cCOLOR_ARR[static_color_index].blue * static_intensity) / COLOR_RESOLUION;
current_color.warm = (cCOLOR_ARR[static_color_index].warm * static_intensity) / COLOR_RESOLUION;
current_color.cold = (cCOLOR_ARR[static_color_index].cold * static_intensity) / COLOR_RESOLUION;
TUYA_CALL_ERR_GOTO(tdl_pixel_set_single_color(sg_pixels_handle, 0, LED_PIXELS_TOTAL_NUM, ¤t_color), __ERROR);
TUYA_CALL_ERR_GOTO(tdl_pixel_dev_refresh(sg_pixels_handle), __ERROR);
__ERROR:
PR_ERR("breathing color effect error");
return;
}
** 무엇을:**
- 모든 LED를 통해 부드러운 호흡 효과를 만듭니다.
- 주요 색상을 통해 사이클 (빨강 → 녹색 → 파란색)
- "breathing"효과에 대한 강도 조절
- 부드러운 색상 전환 및 타이밍 컨트롤
** 기술 구현 :**
- Intensity Modulation: 매끄러운 fade in/out를 위한 사인 파동 기능 사용하십시오
- Color Cycling: 사전 정의된 색상 배열 사이 전환
- 프레임 관리: Static variables는 프레임 사이의 애니메이션 상태를 유지합니다.
2. ** 2D 파 효력 **
static void __2d_wave_effect(void)
{
    OPERATE_RET rt = OPRT_OK;
    PIXEL_COLOR_T tinted_color = {0};
    uint32_t max_cycles = 2;  // Reduced cycles to match other effects
    float max_radius = 11.0f; // Maximum radius to cover the 16x16 matrix
    float wave_speed = 0.5f;  // Faster wave speed for smoother transitions
    float color_saturation = 1.0f;
    float color_value = 1.0f;

    // Static variables for frame-by-frame animation
    static uint32_t static_cycle_count = 0;
    static float static_wave_radius = 0.0f;
    static float static_color_hue = 0.0f;
    static bool animation_complete = false;

    // Reset animation if complete
    if (animation_complete) {
        static_cycle_count = 0;
        static_wave_radius = 0.0f;
        static_color_hue = 0.0f;
        animation_complete = false;
    }

    // Clear LEDs for each frame
    PIXEL_COLOR_T off_color = {0};
    TUYA_CALL_ERR_GOTO(tdl_pixel_set_single_color(sg_pixels_handle, 0, LED_PIXELS_TOTAL_NUM, &off_color), __ERROR);

    // Calculate current wave radius
    static_wave_radius += wave_speed;
    if (static_wave_radius > max_radius) {
        static_wave_radius = 0.0f;
        static_cycle_count++;

        if (static_cycle_count >= max_cycles) {
            animation_complete = true;
        }
    }

    // Continuous color spectrum transition at center
    static_color_hue += 2.0f; // Faster color transition for smoother effect
    if (static_color_hue >= 360.0f) {
        static_color_hue = 0.0f;
    }

    // Base color from spectrum is calculated per LED in the loop below

    // Apply wave effect to each LED
    for (uint32_t y = 0; y < 16; y++) {
        for (uint32_t x = 0; x < 16; x++) {
            float distance = __distance_from_center(x, y);
            float angle = __calculate_angle(x, y);

            // Check if LED is within the expanding wave
            if (distance <= static_wave_radius) {
                // Calculate hue based on distance from center for constant color bands
                float distance_hue = (distance / max_radius) * 180.0f; // Reduced range for smoother transitions
                float current_hue = static_color_hue - distance_hue;   // Hue shifts based on distance
                if (current_hue < 0.0f)
                    current_hue += 360.0f;

                // Convert hue to RGB for constant color
                float h = current_hue / 60.0f;
                float c = color_value * color_saturation;
                float x_val = c * (1.0f - fabsf(fmodf(h, 2.0f) - 1.0f));
                float m = color_value - c;

                float r, g, b;
                if (h < 1.0f) {
                    r = c;
                    g = x_val;
                    b = 0;
                } else if (h < 2.0f) {
                    r = x_val;
                    g = c;
                    b = 0;
                } else if (h < 3.0f) {
                    r = 0;
                    g = c;
                    b = x_val;
                } else if (h < 4.0f) {
                    r = 0;
                    g = x_val;
                    b = c;
                } else if (h < 5.0f) {
                    r = x_val;
                    g = 0;
                    b = c;
                } else {
                    r = c;
                    g = 0;
                    b = x_val;
                }

                // Set constant color (no intensity fade)
                tinted_color.red = (uint32_t)((r + m) * COLOR_RESOLUION);
                tinted_color.green = (uint32_t)((g + m) * COLOR_RESOLUION);
                tinted_color.blue = (uint32_t)((b + m) * COLOR_RESOLUION);
                tinted_color.warm = 0;
                tinted_color.cold = 0;

                // Apply 8-directional tinting
                __apply_directional_tint(&tinted_color, angle, &tinted_color);

                // Set LED color
                uint32_t led_index = __matrix_coord_to_led_index(x, y);
                if (led_index > 0 && led_index <= LED_PIXELS_TOTAL_NUM) {
                    TUYA_CALL_ERR_GOTO(tdl_pixel_set_single_color(sg_pixels_handle, led_index, 1, &tinted_color),
                                       __ERROR);
                }
            }
        }
    }

    TUYA_CALL_ERR_GOTO(tdl_pixel_dev_refresh(sg_pixels_handle), __ERROR);
    // tal_system_sleep(30); // Removed - main loop controls timing // Faster refresh for smoother transitions

__ERROR:
    PR_ERR("2D wave effect error");
    return;
}
** 수학 마법:**
- ** 계산 **:
sqrt((x-7.5)² + (y-7.5)²)매트릭스 센터 - **: 시간 기반 애니메이션과 반경 확장
- ** 색상 주석**: 각도에 따라 8 방향 색상 변형
- **HSV 색상 공간 **: hue, 포화, 값을 사용하여 부드러운 색상 전환
- 압력 기능: 용도
atan2()각 계산 - ** 색상 스펙트럼 ** : 무지개 효과를 위한 연속 hue 회전
- ** 방향 주석**: 나침반 방향에 근거를 둔 다른 색깔
More 애니메이션 효과
데모 codebase는 다른 프로그래밍 기술을 보여주는 몇 가지 추가 애니메이션 효과를 포함합니다:
- Scrolling Text: 무지개 색상 8x8 글꼴 렌더링
- **Ripple Effect ** : 사인 파동 수학을 사용하여 물 같은 리플
- **Snowflake 패턴 ** : 수학 정밀 6 배 회전 심도
- Scan Animation: 열과 행 스캐닝 패턴
- Breathing Circle: 색상 사이클링을 가진 Pulsing 원형 패턴
- ** 멋진 빛 **: 색상 전환과 순차적 LED 활성화
- ** 색상 파**: matrix의 운동 파 효과
각 효력은 시각 효과를 위한 기본적인 LED 통제에서 진보된 mathematical 산법에 근거한 프로그램의 다른 측면을 보여줍니다.
☸ 코드 Walkthrough
Matrix 좌표 변환
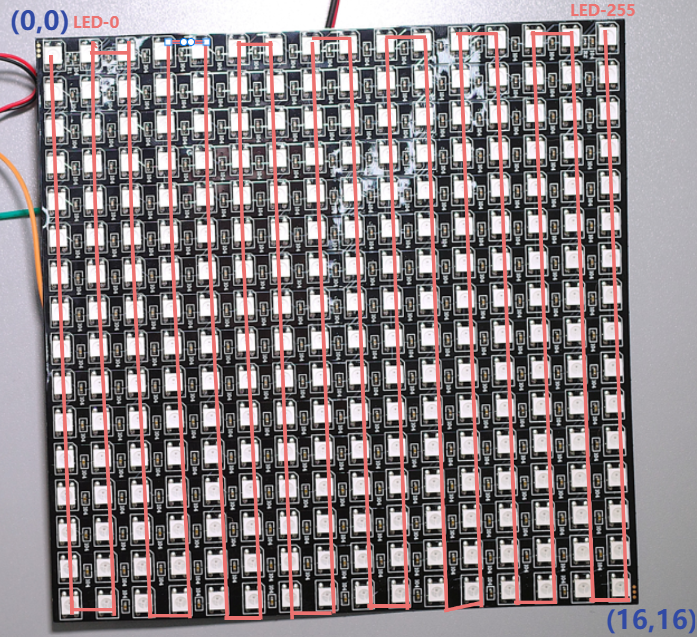
LED 매트릭스는 물리적으로 2D 그리드 (16x16)이지만 LED는 단일 체인에 유선되어 있으므로 올바른 1D LED 인덱스로 변환하는 방법을 필요로합니다. 이것은 핸들__matrix_coord_to_led_index기능.
Zigzag (Serpentine) 설명
- ** 평균 열 (x % 2 == 0) : **
수로 열에 있는 LEDs는 정상에서 바닥에 타전됩니다.
- 인덱스는 다음과 같이 계산됩니다:
index = x * 16 + y
- 인덱스는 다음과 같이 계산됩니다:
- **Odd 열 (x % 2 == 1) : **
이상한 수치는 열에 있는 LEDs는 바닥에서 정상에 타전됩니다.
- 인덱스는 다음과 같이 계산됩니다:
index = (x + 1) * 16 - 1 - y
- 인덱스는 다음과 같이 계산됩니다:
이 패턴은 논리 (x, y)가 각 열의 배선 방향과 관계없이 올바른 물리적 LED로 항상지도를 조정합니다.
예금:
- (x=0, y=0) → 인덱스 0 (왼쪽)
- (x=0, y=15) → 색인 15 (첫번째 란의 밑바닥)
- (x=1, y=0) → 색인 31 (두번째 란의 위, 반전되기 때문에)
- (x=1, y=15) → 색인 16 (두번째 란의 밑바닥)
이 매핑은 이미지, 애니메이션, 또는 텍스트를 올바르게 표시하는 데 필수적입니다. 그것은 물리적 배선을 추상화하고 코드를 자연스럽게 조정합니다 (x, y)과 함께 작동합니다.
static uint32_t __matrix_coord_to_led_index(uint32_t x, uint32_t y)
{
    // Convert 2D matrix coordinates to 1D LED index
    // Handles zigzag pattern for proper LED addressing
    if (x % 2 == 0) {
        // Even column: top to bottom
        led_index = (x * 16 + y);
    } else {
        // Odd column: bottom to top
        led_index = (x + 1) * 16 - 1 - y;
    }
    return led_index;
}
색깔 관리
// HSV to RGB conversion for smooth color transitions
float h = hue / 60.0f;
float c = saturation * value;
float x = c * (1.0f - fabsf(fmodf(h, 2.0f) - 1.0f));
// ... RGB calculation based on hue sector
애니메이션 상태 관리
// Frame-by-frame animation using static variables
static uint32_t frame_count = 0;
static float wave_radius = 0.0f;
static bool animation_complete = false;

// Reset animation when complete
if (animation_complete) {
    frame_count = 0;
    wave_radius = 0.0f;
    animation_complete = false;
}
️ 구성 및 사용자 정의
LED 드라이버 선택
// Choose your LED type by uncommenting the appropriate driver
TUYA_CALL_ERR_RETURN(tdd_ws2812_driver_register(device_name, &dev_init_cfg));
// TUYA_CALL_ERR_RETURN(tdd_sk6812_driver_register(device_name, &dev_init_cfg));
// TUYA_CALL_ERR_RETURN(tdd_sm16703p_driver_register(device_name, &dev_init_cfg));
공급 능력
// Modify effect parameters
#define LED_PIXELS_TOTAL_NUM 256    // Total LED count
#define LED_CHANGE_TIME      800    // Effect timing (ms)
#define COLOR_RESOLUION      1000u  // Color depth
애니메이션 Timing
// Adjust animation speed and duration
static uint32_t max_cycles_per_effect = 200;  // Effect duration
tal_system_sleep(50);  // Frame delay (ms)
▫ 건물 및 번쩍기
자주 묻는 질문
이 프로젝트를 구축하기 전에 TuyaOpen 개발 환경을 설정해야합니다. 상세한 지침에 대한 공식 설정 가이드를 따르십시오.
** 환경 설정 가이드**:TuyaOpen 환경 설정
빠른 설정 명령
# Install required tools (Ubuntu/Debian)
sudo apt-get install lcov cmake-curses-gui build-essential ninja-build wget git python3 python3-pip python3-venv libc6-i386 libsystemd-dev

# Clone TuyaOpen repository
git clone https://github.com/tuya/TuyaOpen.git
cd TuyaOpen

# Activate tos.py environment
. ./export.sh

# Verify installation
tos.py version
tos.py check
프로젝트 컴파일
단계 1: 프로젝트에 Navigate
cd examples/peripherals/leds-pixel
2단계: 프로젝트 구성
# Configure for T5AI board
tos.py config choice
# Select: T5AI.config
3 단계 : 프로젝트 구축
# Build the project
tos.py build
4 단계 : Clean Build (필요한 경우)
# Clean build cache
tos.py clean

# Deep clean
tos.py clean -f
회사 소개
** 플래시 가이드 **:TuyaOpen 펌웨어 레코딩
자주 묻는 질문
- USB를 통해 PC에 T5AI 널을 연결합니다
- Linux/Mac 사용자를 위해:
sudo usermod -aG dialout $USER(그 후 다시 시작) - Windows용: 적절한 USB 드라이버 설치
Flashing 과정
# Flash firmware to device
tos.py flash

# Select the correct serial port when prompted
# T5AI boards typically have two ports:
# - Lower number: Programming port
# - Higher number: Logging port
감시자 산출
# Monitor serial output for debugging
tos.py monitor
구성 옵션
고진 효과 및 수정
사용자 정의 효과 만들기
static void __custom_effect(void)
{
    // Your custom animation logic here
    // Use the matrix coordinate system
    // Apply color mathematics
    // Refresh display
}
새로운 캐릭터 추가
// Extend the font database in led_font.h
{'@', {0x00, 0x3C, 0x66, 0x6E, 0x6A, 0x6E, 0x60, 0x3C}, 8},
성능 최적화
- ** 프레임 속도**: 조정
tal_system_sleep()원하는 FPS - ** 색상 심도 **: 수정
COLOR_RESOLUION광도 수준을 위해 - Memory Usage: RAM 효율성을 위한 정적 변수 최적화
문제 해결
자주 묻는 질문
LED는 점화하지 않습니다
- Check Power: 5V 공급을 보장하는 것은 완전 부하를 취급할 수 있습니다
- ** 데이터 연결**: SPI0 MISO 연결 확인
- **Ground 연결 **: 널과 LED 모체 사이 일반적인 배경을 지킵니다
Flickering 또는 불안정한 전시
- ** 전력 공급 **: 충분한 현재 수용량에서
- ** 타이밍 문제**: 프레임 지연 타이밍 조정
- Signal Quality: 느슨한 연결 확인
색깔 문제점
- ** RGB 주문**: 검증
RGB_ORDER제품 설명 - Brightness: 확인
COLOR_RESOLUION설치하기 - ** 드라이버 선택**: 올바른 LED 유형 선택
🌟 Project Extensions - What to Build Next?
IoT Integration
- Tuya Cloud: Connect to Tuya IoT platform
- Remote Control: Control effects via mobile app
- Scheduling: Time-based effect switching
Advanced Patterns
- Game of Life: Cellular automaton simulation
- Fractal Patterns: Mandelbrot set visualization
- Audio Visualization: Real-time audio reactive effects
Hardware Upgrades
- Larger Matrix: Scale to 32x32 or 64x64
- Multiple Panels: Chain multiple matrices
- 3D Effects: Add depth with layered displays
🎉 Conclusion
Congratulations! You've built an incredible LED matrix display system that demonstrates the power of embedded programming, mathematical algorithms, and creative engineering. This project showcases:
- Advanced Animation Techniques: From simple color changes to complex wave patterns
- Mathematical Modeling: Using trigonometry and wave functions for visual effects
- Hardware Integration: Seamless communication between microcontroller and LED matrix
- Creative Programming: Turning mathematical concepts into stunning visual art
What's Next?
- Experiment with your own custom effects
- Integrate with IoT platforms for remote control
- Scale up to larger matrices for even more impressive displays
- Share your creations with the maker community!
해피 만들기! ✨
- TuyaOpen SDK*를 사용하여 ❤️으로 구성